1942–1943: Guadalcanal and New Guinea
Battle of Buna–Gona
- Dates:
- 16 November 1942 – 22 January 1943
- Front:
- Pacific
- Location:
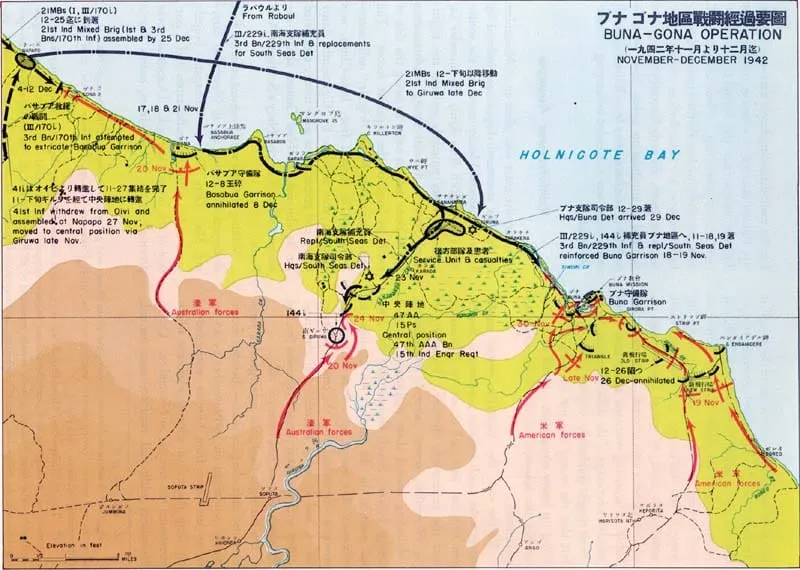
- Territory of Papua (New Guinea): the coastal strip between Gona and Cape Endaiadere – Gona, Sanananda and Giruwa, Buna village and Buna Government Station, the Duropa Plantation – and the swamps and tracks leading to them from the Owen Stanley RangeOn the battle map →
- Sides:
- Australia and the United StatesDouglas MacArthur, Thomas Blamey, Edmund Herring, Robert Eichelberger, George VaseyJapanYosuke Yokoyama, Yoshitatsu Yasuda, Kensaku Oda
- Result:
- Allied victory. The Australians took Gona on 9 December 1942, the Americans took Buna village on 14 December, and Australians and Americans together took Buna Government Station on 2 January 1943; resistance at Sanananda ceased on 22 January. The Japanese lost their beachheads in Papua, but the Allies paid for them with losses that were heavier, relative to the number of troops engaged, than on Guadalcanal.
- Author:
- Łukasz
Name and dates
The Battle of Buna–Gona is the name given to the fighting between Australian and American troops and the Japanese for three fortified beachheads on the north coast of the Territory of Papua: Gona in the west, Sanananda and Giruwa in the centre, and Buna in the east. Australians often speak of the battle for the Beachheads, while Americans speak of the Papuan campaign, of which Buna was the bloodiest part.
Following the Australian official history by Dudley McCarthy and the American one by Samuel Milner (“Victory in Papua”), the battle is usually dated from 16 November 1942 to 22 January 1943. The first date is the day on which the Australian 7th Division completed its crossing of the Kumusi River and set off towards the coast, while the American 32nd Infantry Division was approaching Buna from the south. The same day marks the end of the Kokoda Track campaign. The second date is the day on which organised Japanese resistance at Sanananda ceased.
The battle broke down into three separate struggles, fought almost simultaneously along a stretch of coast some 25 km long: the Australian attack on Gona (taken on 9 December); the American and Australian fighting for Buna (the village taken on 14 December, Cape Endaiadere and the airstrips at the end of December, the Government Station on 2 January); and the longest of the three, the Australian and American fighting along the track to Sanananda (until 22 January).
Background
The Japanese had appeared on this coast in July 1942. After their setbacks in the Coral Sea in May and at Midway in June, they had given up the idea of a seaborne landing at Port Moresby, the capital of Papua, and decided to reach it overland. On the evening of 21 July Colonel Yosuke Yokoyama’s advance guard landed near Gona, followed by the South Seas Detachment (Nankai Shitai) of Major General Tomitarō Horii. Along the coast between Gona and Buna the Japanese built bases, depots, hospitals and an airstrip, from which their troops set off across the Owen Stanley Range. At the end of August a second Japanese landing, at Milne Bay on the eastern tip of the island, was repulsed by the Australians.
In mid-September Horii reached Ioribaiwa, some 40 km from Port Moresby, but there he had to halt. Since 7 August the Americans had been fighting on Guadalcanal, and Lieutenant General Harukichi Hyakutake’s 17th Army at Rabaul could not supply two fronts at once. The starving detachment was ordered to withdraw and hold the beachheads on the coast until the issue on Guadalcanal had been decided. The Australian 7th Division followed it across the mountains, retook Kokoda on 2 November and on 4–11 November defeated the Japanese at Oivi and Gorari. The orderly withdrawal turned into a rout; Horii himself drowned in the second half of November (sources give 19 or 23 November) while trying to float down the Kumusi on a raft and then reach his own lines by boat along the coast.
On the Allied side, the South West Pacific Area had existed since the spring of 1942 under General Douglas MacArthur, who had arrived in Australia in March. Land forces were commanded by the Australian General Thomas Blamey; from September he was at Port Moresby, personally directing New Guinea Force, and in October Lieutenant General Edmund Herring took command of it. In November MacArthur moved his advanced headquarters to Port Moresby. In September the first units of Major General Edwin F. Harding’s American 32nd Infantry Division – a National Guard formation from Michigan and Wisconsin – arrived in New Guinea. In October some of its men crossed the mountains by the Kapa Kapa track, while others were flown or shipped to the north coast to strike at Buna from the south-east.
MacArthur’s staff imagined that after the defeat in the mountains the beachheads would fall quickly. His chief of staff, Major General Richard Sutherland, spoke of the Japanese defences as “hastily dug field trenches”. The maps were inaccurate, and artillery and tanks were judged unnecessary because air power was to take their place. Every one of these assumptions proved wrong.
Terrain, the wet season and disease
The beachheads lay some 160 km north-east of Port Moresby, on a narrow strip of dry land between the sea and swamps of mangrove, nipa and sago palm. Only a few tracks, 3–4 metres wide, led through the swamps. The airstrip at Buna lay a metre and a half above sea level, and the water table was less than a metre below the surface, so trenches and weapon pits quickly flooded. The drier ground was covered by jungle or by sharp-bladed kunai grass taller than a man, in which the temperature in the sun reached 50°C. Neglected coconut plantations lined the coast.
The fighting took place in the wet season. Downpours usually came in the afternoon, and daily rainfall reached 200–250 mm. Lieutenant General Robert Eichelberger recalled that some 170 inches – more than 4 metres – of rain fell at Buna that year, “and I think we got more than our share in December and January”.
The area was one of the most malarial places in the world. Besides malaria, the troops were ravaged by dengue fever, scrub typhus, tropical ulcers, dysentery and fungal infections, and poor and inadequate rations made them more vulnerable to disease. Quinine was in short supply, the Australians adopted Atebrin as the official prophylactic only at the end of December, and many officers did not make their men take it. The American historian Eric Bergerud estimates that 85–95 per cent of Allied soldiers in the area carried malaria; for every man wounded in battle almost five were evacuated sick to hospital, three-quarters of them with malaria. Japanese accounts of sickness among the defenders are, as historians note, just as harrowing.
Supply
The course of the battle was decided to a very great extent by logistics. The Allied troops approaching the coast were supplied by air drops, in which as much as half the load was lost or smashed. Ammunition and food were short from the very first days. Later, airstrips were built at Dobodura, Popondetta and elsewhere, but bad weather over the mountains and a shortage of transport aircraft constantly limited deliveries. Gradually a sea route to Oro Bay was surveyed; the first sizeable ship, the Karsik, unloaded there on the night of 11–12 December, after which regular convoys began to run (Operation Lilliput). More than 3,000 Papuans worked for the Allies as carriers and labourers, taking ammunition up to the front and bringing the wounded back.
The Japanese began the battle well supplied – stocks of rice were found at Gona after its capture – but Allied air power cut them off from Rabaul ever more effectively. Destroyers tried to bring in troops, but some of the convoys were turned back after air attacks. Submarines could deliver little; the last delivery for Buna was brought in by a submarine on the night of 25 December. By the end of December a Japanese soldier was receiving less than half the normal daily ration of rice, at the beginning of January a handful, and on 8–12 January nothing at all. By the end of the fighting the garrison was starving, and the Allies found ample evidence that the Japanese had eaten the bodies of the dead.
Forces and commanders
The Japanese. The beachheads were defended by army and navy units: the remnants of the South Seas Detachment, the 144th Infantry Regiment, Colonel Yosuke Yokoyama’s 15th Independent Engineer Regiment, construction units, and naval infantry – the Yokosuka 5th Special Naval Landing Force and part of a Sasebo unit under Captain Yoshitatsu Yasuda, a specialist in land warfare. After Horii’s death the South Seas Detachment was temporarily commanded by Yokoyama, and from December by Major General Kensaku Oda. On 2 December Major General Tsuyuo Yamagata landed at the mouth of the Kumusi with the 21st Independent Mixed Brigade; on 6 December he reached the beachheads and took overall command. From 16 November the whole region came under the new headquarters of Lieutenant General Hitoshi Imamura’s 8th Area Army at Rabaul, and operations in New Guinea were taken over by Lieutenant General Hatazō Adachi’s 18th Army.
The strength of the defenders is uncertain; the American official historian Samuel Milner cautioned that “it is impossible to give an exact figure”. Studies usually speak of 5,500 men at the start of the battle and 6,500 after the reinforcements of 17 and 18 November, and of 11,000–12,000 in all, including later reinforcements and the units operating on the Kumusi and the Mambare. Buna was held by 2,000–2,500 men, Gona by 800–900, and the Sanananda and Giruwa area (including the hospitals) by 4,000–5,500. Their great asset was their fortifications: hundreds of bunkers built of palm logs and earth, and machine-gun posts sited in depth, mutually supporting and superbly camouflaged. The Allies later rated them among the strongest they encountered during the war.
The Allies. The attack was opened by two brigades of Major General George Vasey’s Australian 7th Division (the 16th and 25th), worn out by the fighting in the mountains and at about a third of their establishment, and by two regiments (the 126th and 128th) of Harding’s American 32nd Infantry Division, almost at full strength but without combat experience or training for jungle warfare. In the course of the battle four more Australian brigades (the 21st, 30th, 18th and 14th) arrived, together with the 127th Infantry Regiment of the 32nd Division, the 163rd Infantry Regiment of the American 41st Division and a squadron of 19 M3 Stuart light tanks from the Australian 2/6th Armoured Regiment. Herring had direct command of both divisions, with Blamey and MacArthur above him. MacArthur never once visited the front and did not know the conditions of the fighting, yet he pressed his subordinates for quick results.
Course of the battle: the first attacks (16–30 November)
On 16 November the Australian 7th Division completed its crossing of the Kumusi at Wairopi, some 65 km from the coast. The 25th Brigade advanced on Gona along the track from Jumbora, the 16th Brigade on Sanananda along the track from Soputa, while the American 32nd Division approached Buna along the coast and by the track from Simemi. On 19 November Herring placed two battalions of the 126th Infantry under the 7th Division in order to concentrate forces against Sanananda, which embittered Harding. On 17 and 18 November destroyers still managed to land 1,000–1,500 Japanese troops at Buna.
The first attacks went in on 19 November. At Buna the 1st and 3rd Battalions of the 128th Infantry, supported by just two mountain howitzers, struck on the eastern flank – by the Duropa Plantation and the airstrips near Cape Endaiadere – and immediately stalled under fire from the Japanese bunkers. The force in the east was named Warren Force, and the one in the west, facing Buna village and Buna Government Station, Urbana Force. On 21 November a “general” attack by Warren Force was preceded by an air raid whose bombs killed and wounded 24 Americans without dislodging the Japanese. An attack on 30 November also failed to bring a decision. Urbana Force bogged down in front of a forward Japanese position known as the Triangle; on 24 November one of its own fighters strafed its headquarters. By the end of the month the 32nd Division had lost 492 men and gained a few hundred metres.
At Gona the 25th Brigade ran into the defences on 19 November. Its battalions, which had come the whole length of the Kokoda Track, attacked on 22, 23 and 25 November on a narrow front between the sea and the swamp and were thrown back each time; on 26 November the Japanese themselves counter-attacked. The brigade was relieved by Brigadier Ivan Dougherty’s 21st Brigade, barely a thousand strong. Its attacks on 29 and 30 November and 1 December broke into the village but could not hold it; in five days the brigade lost 340 men, more than a third of its strength.
On the track to Sanananda the 16th Brigade struck the Japanese on 20 November at the fork of the tracks leading to Cape Killerton. Two companies under Captain Basil Catterns outflanked them on the left and fought through the night; of their 91 men, 31 were killed and 36 wounded. On 30 November an American detachment (about 250 men of the 126th Infantry) established a position astride the track behind the first Japanese line, named the Huggins roadblock after Captain Meredith Huggins, who later commanded it. The Japanese positions were surrounded but not cut off, and the roadblock itself was in an equally precarious situation. By the end of November all three sectors were deadlocked in what was likened to “a tropical version of the trench warfare of the last war”.
“Take Buna or not come back alive”
MacArthur grew increasingly impatient at the lack of progress at Buna. On Guadalcanal the Navy was winning successes, the Australians had beaten the Japanese at Milne Bay and on the Kokoda Track, and the only American division in his area was standing still. Many historians judge that the haste served MacArthur’s standing more than any strategic need. When Blamey proposed sending further units to the front, MacArthur suggested an American regiment; according to those present, Blamey replied that he would rather send Australians because he knew they would fight – a remark MacArthur took as a humiliation.
On 30 November MacArthur summoned Lieutenant General Robert Eichelberger, commander of the American I Corps, to Port Moresby. According to Eichelberger’s memoirs, he told him to relieve Harding and every officer who would not fight, and said: “Bob, I want you to take Buna, or not come back alive.” On 1 December Eichelberger flew to Dobodura and took command of the Buna sector. After an inspection on 2 December he relieved Harding, replacing him with the division’s artillery commander, Brigadier General Albert Waldron, and also relieved the regimental commanders and most of the battalion commanders. He ordered improvements in rations and medical care and halted operations for two days to sort out the intermingled units.
Eichelberger walked the front line with three stars on his collar, although custom required insignia to be removed so as not to draw snipers’ fire. Several times he came under fire, once at a range of a dozen or so metres, and on 5 December Waldron was wounded at his side and was replaced by Brigadier General Clovis Byers. Some officers of the 32nd Division afterwards called him a ruthless “Prussian”, and the soldiers nicknamed the divisional cemetery “Eichelberger Square”.
Course of the battle: the fall of Gona (9 December)
At Gona the 21st Brigade was reinforced by Lieutenant Colonel Ralph Honner’s 39th Battalion – the same militia unit that in July had been the first to confront the Japanese on the Kokoda Track. The bled-white 2/16th and 2/27th Battalions were merged into a single composite battalion, and on 4 December the 25th Brigade was withdrawn to Port Moresby. An attack on 6 December again stalled. A final attempt – Dougherty’s “last throw” – was planned for 8 December; Vasey decided that if it failed, Gona would merely be contained and forces concentrated on Sanananda.
That day the aerial bombs fell mainly on the Australian positions, so the attack was postponed and preceded by a bombardment of 250 shells with delay fuzes, which burst in the ground and destroyed bunkers without so easily wounding the attackers. Honner led his battalion in close behind the artillery fire. By evening only a small pocket of the Japanese defences remained, and it was taken on the morning of 9 December. Honner reported to Dougherty: “Gona’s gone!” The Australians buried several hundred Japanese bodies on the spot; some of the defenders were killed trying to escape along the beach.
Fighting west of Gona went on, however. Japanese reinforcements, mainly from the 170th Infantry Regiment, landed at the mouths of the Kumusi (2 December) and the Mambare (12 December) and tried to break through to the east. They were stopped by Lieutenant Haddy’s company; Haddy was killed on 7 December, and on 18 December the 39th Battalion and the remnants of the 2/14th Battalion captured “Haddy’s Village” on the Amboga River.
Course of the battle: Buna village (14 December)
On 5 December Urbana Force attacked Buna village from the south with four companies. The flanking companies stalled, but Staff Sergeant Herman Bottcher, a German-born American, broke through with 18 men to the sea between the village and the Government Station. His platoon held off counter-attacks for a week – Bottcher was wounded twice – and cut the village off from supplies. He received a battlefield commission as captain and the first of his two Distinguished Service Crosses. The same day, in the Warren Force sector, Bren carriers led an unsuccessful attack; the Japanese quickly knocked them out.
For the following week both sides confined themselves to infiltration and fire. On 11 December the fresh 3rd Battalion of the 127th Infantry relieved a battered battalion of the 126th. On the morning of 14 December, after a heavy mortar bombardment, it advanced on the village – and found it empty, as the defenders had slipped away during the night. The last Japanese positions west of Entrance Creek, in a coconut grove, were taken on 16–17 December. The fall of Buna village was the Americans’ first visible success, but the stronger part of the Japanese defences – the Government Station, the Triangle and the fortifications by the airstrips and Cape Endaiadere – remained intact.
Course of the battle: tanks at Cape Endaiadere (18 December – 2 January)
The deadlock on the eastern flank was broken by the Australians. Brigadier George Wootten’s experienced 18th Brigade, which had defended Tobruk in 1941 and fought at Milne Bay in August, arrived at Oro Bay by sea, bringing M3 Stuart light tanks with it. The brigade was placed under the 32nd Division and given command of the American battalions of Warren Force. On 18 December the 2/9th Battalion, with seven tanks, attacked in the belt between the airstrip and the sea. On the first day it lost 11 officers and 160 other ranks and two tanks were destroyed, but the front was pushed up to Cape Endaiadere itself. “Behind the tanks came the brisk Australian veterans, tall, moustached, upright, their submachine guns blazing,” Eichelberger later wrote of the attack, which he called “spectacular, dramatic and brave”.
The Japanese abandoned their positions by the New Strip and in front of the bridge over Simemi Creek. The 2/10th Battalion forced the creek on 22 and 23 December and seized a bridgehead by the bridge. On 24 December a concealed anti-aircraft gun destroyed all four tanks supporting the attack along the Old Strip, but the infantry kept moving forward. The last pocket of resistance, in the coconut plantation beyond the airstrip, fell on 2 January 1943 after an attack by the 2/12th Battalion with six tanks; in two days the battalion lost more than 190 men, and the 18th Brigade a total of 863 since 18 December.
Course of the battle: Buna Government Station (2 January 1943)
In the west Urbana Force suffered heavy losses throughout the second half of December with little progress. Attacks across Musita Island and on the Triangle (18–20 December) ended in failure. Byers was wounded on 16 December, and from that day Eichelberger commanded the 32nd Division himself. On the night of 21 December a battalion of the 127th Infantry crossed Entrance Creek in assault boats and built a bridge, over which five companies passed on Christmas Eve. The attack through the former Government Gardens on 24–25 December broke down into confused fighting by individual companies. On the night of 25 December the last Japanese submarine unloaded supplies for the Station.
On the night of 29 December it emerged that the Japanese were no longer defending the spit on the seaward side. An attack on 31 December almost ended in disaster when an inexperienced company broke and ran after its commander was wounded; it was rallied by the regimental commander, Colonel John Grose. On 1 January the Americans and Australians attacked the Station from two sides, and on 2 January some of the defenders began trying to escape by swimming. In the afternoon the units attacking from the spit and from the bridge linked up, and the 18th Brigade joined hands with Urbana Force. Captain Yasuda and the commander of the 144th Infantry Regiment, Colonel Yamamoto, were killed; according to Japanese accounts Yasuda either fell in the final attack or committed suicide. By 3 January the whole Buna area as far as the Girua River had been cleared; only about 50 prisoners were taken there, most of them not Japanese but labourers. Yasuda, regarded in the Japanese navy as an authority on land warfare, was posthumously promoted two ranks to vice admiral, and his lengthy testament, with its observations on Allied tactics, was valued in the army as well as a kind of tactical manual.
In many accounts the last bastion at Buna is called “Buna Mission”. More precisely, it was the Government Station (Buna Government Station) – an outpost of the Australian colonial administration, surrounded by a coconut plantation.
Course of the battle: Sanananda and the end of the battle (December – 22 January 1943)
The track to Sanananda proved the toughest nut of all. The Japanese positions around the Huggins roadblock were attacked without success by the Americans (5 December) and then by the Australian 30th Brigade, made up of militia battalions (7 December), at heavy cost and for negligible gains. Huggins himself, who had taken command of the roadblock after the death of Captain John Shirley, was wounded on 8 December. In the second half of December the 36th Battalion and the 2/7th Cavalry Regiment, fighting on foot, arrived. Their attack on 19 December won a second roadblock, named James’s roadblock after its commander, and cut off another group of Japanese positions, but did not break the defences. On 22 December the Huggins roadblock was taken over by the 39th Battalion, brought over from Gona.
According to a tally by the 7th Division staff, between 25 November and 23 December the division received 4,273 reinforcements but lost 5,905 men from all causes – so Vasey had more than 1,600 men fewer than at the start. There were no Australian reserves left, so the American 163rd Infantry Regiment, which had reached Port Moresby on 27 December, was sent to Sanananda, followed after the fall of Buna by the 18th Brigade with its tanks. Vasey wrote in his letters that the Japanese soldier “will not give up until he is killed, and inflicts heavy casualties on us in the process”, and compared the situation to “Crete in reverse”.
On 12 January the 18th Brigade attacked the forward Japanese positions with three tanks, which a concealed anti-tank gun quickly knocked out on the narrow track. The attack was repulsed, and Vasey wrote in an appreciation of the situation that attacking bunkers with infantry alone meant “repeating the costly mistakes of 1915–1917”. Meanwhile the Japanese were already withdrawing – they had long been planning an evacuation, but the pace of the Allied advance overtook them. On the nights of 12–13 and 13–14 January they abandoned their positions on the track, and between 13 and 20 January some 1,200 sick and wounded were taken off by sea. On 20 January Yamagata issued the order for a general withdrawal and left by boat himself; on the night of 21 January the troops began to break out westwards, beyond Gona – between 1,000 and 1,900 men escaped in this way.
The Australians and Americans pushed through the swamps to the sea. On 18 January the 2/9th Battalion took Sanananda village from the swamp side, and on 21 January the American 127th Infantry, advancing along the coast from Buna through Tarakena, occupied Giruwa. General Oda, who was to lead out the remnants of the South Seas Detachment, could find no boats, as earlier transports had taken them; he was killed around 20–21 January together with a staff officer – according to some accounts he committed suicide, according to the American official history he was killed trying to break through the Australian outposts. The Japanese who remained in the beachhead fought almost to the last man. At 1.15 p.m. on 22 January a report came in that the 2/9th and 2/10th Battalions had linked up on the coast west of Sanananda and that organised resistance had ceased. The same day the 163rd Infantry wiped out the last encircled positions on the track. Scattered groups of Japanese wandered the area for many days afterwards.
Losses
The Australians lost 3,471 men in battle, including 1,204 killed and died of wounds and 66 missing, not counting the sick. The American ground forces, numbering 13,645 men, had 671 killed, 116 dead from other causes, 2,172 wounded and 7,920 sick – 10,879 men in all. Some battalions effectively ceased to exist: the 2nd Battalion of the 126th Infantry dwindled on the Sanananda track from more than 1,300 men to 158. According to Milner’s figures, more than 33,000 Americans and Australians fought in the Papuan campaign as a whole, of whom 8,546 became battle casualties and 3,095 were killed; on Guadalcanal, where some 60,000 Americans fought, one soldier in 37 was killed, in Papua one in 11. The American historian Stanley Falk called the Papuan campaign one of the costliest Allied victories in the Pacific relative to the forces committed.
Japanese losses are even harder to establish than the strength of the defenders. Japanese sources give about 8,000 killed and dead. More than 200 men, 159 of them Japanese, were taken prisoner at Gona and Sanananda, and only about 50 at Buna.
Significance
The Battle of Buna–Gona ended the Japanese attempt to take Port Moresby and drove the Japanese out of Papua. The Allies gained the north coast of the island, and Dobodura became a large forward air base, from which the defence of Wau and the landings at Lae and Salamaua were supported in 1943. In the United States, photographs of Americans killed at Buna, published in 1943, showed the public the dead of its own army for the first time.
For the Allies Buna was a costly school of jungle warfare. It showed that bunkers called for tanks, artillery, engineers and patient outflanking of positions rather than repeated frontal assaults, and that hygiene discipline – above all the fight against malaria – determined fighting strength as much as weapons did. These lessons became the basis of Australian Army tactics for the rest of the war; the Americans applied them in training the divisions bound for the Pacific. The Australian historians Dudley McCarthy and Lex McAulay asked whether the beachheads might simply have been surrounded and starved out, but both concluded that the Allies needed the battle and the victory. What is clear is that the haste forced by MacArthur increased the losses and may even have prolonged the fighting – outflanking and infiltration produced results where successive assaults failed.
For the first time the Allies encountered, on such a scale, a Japanese defence fought to the last man. “Buna was […] bought at a high price in death, wounds, disease, despair and human suffering. No one who fought there will forget it,” Eichelberger wrote in 1950. The same kind of fighting – bunkers, hunger, disease and defenders who would not surrender – was to recur in the Pacific until the end of the war. At the same time as the last fighting at Sanananda, the Japanese were preparing the evacuation of Guadalcanal, completed in February 1943. Together the two victories meant that the initiative in the South West Pacific had passed to the Allies.