1941–1942: The Japanese offensive in the Pacific
Indian Ocean raid
- Dates:
- 31 March – 10 April 1942
- Front:
- Pacific
- Location:
- The eastern Indian Ocean: Christmas Island, the waters around Ceylon (Colombo, Trincomalee, Addu Atoll in the Maldives) and the Bay of Bengal off the east coast of IndiaOn the battle map →
- Sides:
- JapanChūichi Nagumo, Nobutake Kondō, Jisaburō OzawaUnited KingdomJames Somerville, Geoffrey Layton
- Result:
- Tactical Japanese victory without a strategic decision. The aircraft carrier Hermes, the cruisers Cornwall and Dorsetshire, three smaller warships, several dozen merchant ships and about 40 aircraft were lost; the Japanese lost a dozen or more aircraft. The main body of the Eastern Fleet avoided battle and withdrew to East Africa and Bombay, and Japan never returned to the Indian Ocean with a carrier force.
- Author:
- Łukasz
Name and dates
The Indian Ocean raid is the name given to the Japanese fleet’s foray into the waters around Ceylon and into the Bay of Bengal in the spring of 1942. The Japanese called it Operation C (C作戦), and in their historiography it is also known as the Battle of Ceylon; in Britain it was best remembered for its first day over the island, the “Easter Sunday raid” on Colombo on 5 April. The core of the force was the five-carrier striking force of Vice Admiral Chūichi Nagumo, the same force that four months earlier had attacked Pearl Harbor. At the same time a force under Vice Admiral Jisaburō Ozawa, with a light carrier, struck at shipping in the Bay of Bengal, while Japanese submarines hunted merchant ships off the west coast of India.
Most modern studies date the raid from 31 March to 10 April 1942. On 31 March Admiral James Somerville’s British Eastern Fleet was already deployed south of Ceylon, waiting for the attack that intelligence had predicted; on the same day a Japanese landing force occupied Christmas Island, south of Java, without a fight. That landing was formally a separate operation (Operation X), carried out by a different force, but it belonged to the same Japanese push into the Indian Ocean and is therefore counted as part of the raid. On 10 April, after the strike on Trincomalee and the sinking of Hermes, Nagumo’s force turned east towards the Andaman Islands and the Strait of Malacca, and the Japanese submarines were ordered home. The carrier force itself had sailed from Staring Bay in Celebes as early as 26 March, and its ships reached Japanese ports from 22 April onwards.
The times given in the sources differ, because the two sides kept time in different zones (the Japanese used Tokyo time); where possible, therefore, the time of day is given rather than an exact hour. The numbers of aircraft shot down and of casualties also vary, and they are given with the discrepancies noted.
Background
In the first three months of the Pacific War the Japanese destroyed Britain’s position in South-East Asia. On 10 December 1941 their aircraft sank the battleship Prince of Wales and the battlecruiser Repulse; on 15 February 1942 Singapore surrendered; at the beginning of March Java fell; and on 8 March the Japanese entered Rangoon. On 23 March they occupied the Andaman Islands unopposed, which gave them control of the Andaman Sea and a safe sea route to Rangoon, through which they could supply their army fighting in Burma. The Indian Ocean now lay open to the Japanese fleet, and with it the routes on which Britain’s entire war in the East depended: the convoys from Britain round Africa to Egypt, to the Persian Gulf (including supplies for the USSR through Iran), to India and to Australia.
The key to those routes was Ceylon, with its two ports: the commercial harbour of Colombo on the west coast and the fleet base at Trincomalee on the east. After the fall of Singapore, Colombo became the main convoy assembly port in the eastern Indian Ocean; a harbour designed for about 45 ships often held more than a hundred. As late as December 1941 the island’s defences had been little more than token. In March 1942 Admiral Sir Geoffrey Layton, until then acting commander of the Eastern Fleet, took command of all forces on Ceylon, with authority over the governor’s civil administration as well. By April three squadrons of Hawker Hurricane fighters had been brought to the island (two near Colombo, one near Trincomalee), together with two Fleet Air Arm squadrons of Fairey Fulmar carrier fighters, a dozen or so Bristol Blenheim light bombers, a few Catalina flying boats, radar stations and about 140 anti-aircraft guns. Two brigades of the Australian 6th Division, on their way home from the Middle East, were also arriving on the island.
In February 1942 the Japanese navy had even considered a landing on Ceylon, but the army had no troops for it and the fleet was needed in the Pacific. The invasion plan was shelved, and on 9 March Admiral Isoroku Yamamoto ordered a limited operation instead: a carrier raid intended to destroy the British fleet on Ceylon, preferably in harbour, to paralyse shipping in the Bay of Bengal and to cover the Japanese offensive in Burma from the sea. The whole operation came under the commander of the Southern Force and the 2nd Fleet, Vice Admiral Nobutake Kondō, while the strike itself was entrusted to Nagumo’s 1st Air Fleet, known as the Kidō Butai. The attack on Colombo (“C-Day”) was set for 5 April.
Opposing forces
Nagumo’s force comprised five fleet carriers: Akagi, Sōryū, Hiryū, Shōkaku and Zuikaku. It differed from the force that had attacked Pearl Harbor only in the absence of Kaga, which had grounded on a reef at Palau in February and been sent home for repairs. The carriers embarked about 300 aircraft – Aichi D3A (“Val”) dive-bombers, Nakajima B5N (“Kate”) torpedo bombers and Mitsubishi A6M (“Zero”) fighters – flown by crews who were at that time the finest carrier aviators in the world. The escort consisted of four fast battleships of the Kongō class, two heavy cruisers of the Tone class, a light cruiser and eight destroyers. Ozawa’s force, known as the Malaya Force, had the light carrier Ryūjō, several heavy cruisers, among them the four Mogami-class ships of Rear Admiral Takeo Kurita’s 7th Cruiser Division, a light cruiser and four destroyers. Seven submarines of the 2nd Submarine Squadron were to reconnoitre Ceylon’s ports and attack shipping.
On paper the British Eastern Fleet was strong, with five battleships and three aircraft carriers. Somerville, who had reached Ceylon at the end of March and taken over command from Layton, is said, however, to have called it a scratch force. Its ships had never worked together, and their crews and aircrews were poorly trained. Somerville divided the fleet into two forces. The fast Force A consisted of the modernised battleship Warspite (the flagship), the modern carriers Indomitable and Formidable, the heavy cruisers Cornwall and Dorsetshire, two light cruisers and six destroyers. The slow Force B under Vice Admiral Algernon Willis comprised four old, unmodernised battleships of the Revenge class, the small carrier Hermes, three light cruisers (among them the Dutch Jacob van Heemskerck) and several destroyers. The two carriers of Force A had fewer than a hundred aircraft between them, most of them obsolete Fairey Albacore and Swordfish biplane torpedo bombers, and their fighters (Fulmars, Martlets and Sea Hurricanes) were no match for the Zero. Japanese carrier aviation outmatched Somerville’s carriers more than three to one, and not only in numbers.
The British trump card was intelligence. The cryptanalysts of the Far East Combined Bureau, Bletchley Park’s Far Eastern outpost, which had moved from Singapore to Ceylon, had since 3 March again been reading part of the traffic in the Japanese navy’s main operational code (JN-25B). In mid-March they established that the Japanese carriers were gathering at Staring Bay; around 20 March, that the carrier force was to strike in early April at a target designated “DG”; and on 28 March, that the target was Colombo. Intelligence nevertheless wrongly estimated the enemy’s strength at two carriers and the date of the attack as 1 April. Somerville, whom the Admiralty had instructed above all not to put the fleet at risk, reasoned that since he knew the enemy’s intentions he could attack the Japanese carriers at night with his radar-equipped Albacores while keeping beyond the range of Japanese reconnaissance by day.
Course of events: Christmas Island and a fruitless wait (31 March – 3 April)
Christmas Island, about 360 kilometres south of Java, was a British possession administered from Singapore and a valuable source of phosphate. It had a population of about 1,700, mostly Chinese and Malays working in the mine. The garrison numbered just over 30 men of the Hong Kong and Singapore Royal Artillery with a single old 6-inch (152 mm) gun: their commander, Captain L. W. T. Williams, four British NCOs and gunners, and an Indian officer with 27 Punjabi gunners. On 11 March some of the Punjabis, probably influenced by Japanese propaganda calling for the liberation of India, mutinied, shot Williams and the four Britons and threw their bodies into the sea. The remaining Europeans, including the district officer, were placed under arrest.
As early as 14 March the Japanese command ordered the island to be seized. A force under Rear Admiral Shōji Nishimura, with the light cruiser Naka as flagship, two other light cruisers and eight destroyers, escorted transports carrying about 850 naval infantry and construction troops. At dawn on 31 March Japanese aircraft bombed the radio station, and the mutineers ran up a white flag before the landing force went ashore. The Japanese landed at Flying Fish Cove without a shot being fired (the Battle of Christmas Island). The only resistance came from the American submarine Seawolf: she missed on 31 March, but on the evening of 1 April hit Naka with a torpedo, and the cruiser had to be towed to Singapore and then sent to Japan for a year of repairs. On 3 April most of the invasion force sailed away, leaving a garrison of about 20 men on the island. After the war some of the mutineers were tried by court martial.
Meanwhile Somerville was waiting for the Japanese south of Ceylon. The fleet put to sea on 30 March and on 31 March took up a position about 100 nautical miles south of the island, from which it moved away from the enemy’s expected line of approach by day and closed it by night. The Catalinas patrolled chiefly the south-eastern sector. But the Japanese did not come: intelligence had got the date wrong by several days, for Nagumo’s force had left Staring Bay only on 26 March, delayed by the late arrival of the two carriers of the 5th Carrier Division. The old battleships of Force B were running out of drinking water, and all the ships were running short of fuel. On the evening of 2 April Somerville concluded that either the threat had passed or the intelligence had been wrong, and he took the fleet to the secret base at Addu Atoll in the Maldives (Port T), about 600 nautical miles south-west of Ceylon. He sent some ships back to their previous tasks: Cornwall and Dorsetshire went to Colombo, the former to resume a refit and the latter to escort a troop convoy, and Hermes, with the Australian destroyer Vampire, to Trincomalee. Ceylon’s defences stood down to a lower state of readiness. In these days Japanese submarines sank the first merchant ships off India and Ceylon, and on 1 April Ozawa’s force sailed from Mergui in Burma.
Course of events: the Easter Sunday raid on Colombo (4–5 April)
On the afternoon of 4 April a Catalina of No. 413 Squadron of the Royal Canadian Air Force, piloted by Squadron Leader Leonard Birchall, sighted the Japanese force about 360 miles south-east of Ceylon. The crew managed to transmit a sighting report, though not the number of ships, before Zeros shot the flying boat down; Birchall and five of his men were taken prisoner. The report was received in Colombo, and when the Japanese intercepted a request for it to be repeated, they knew they had lost the element of surprise. Birchall was later called “the saviour of Ceylon”. Somerville was refuelling at Addu at the time; Force A sailed east that same night, but Force B could not get under way until the morning. Layton ordered the merchant ships out of Colombo harbour, although several dozen of them were unable to leave because of defects. Cornwall and Dorsetshire, which had only just reached Colombo, were sent out that evening to rendezvous with Force A, while Hermes and Vampire left Trincomalee and took refuge north-east of the island.
On Easter Sunday, 5 April, shortly after 6 a.m., 91 bombers and 36 fighters took off from the Japanese carriers under Commander Mitsuo Fuchida, who had also led the attack on Pearl Harbor. Radar failed to detect them, and the aircraft appeared over Colombo at about 7.45 a.m., just as the alarm was being sounded. Hurricanes and Fulmars took off from Ratmalana airfield under fire, and six Swordfish torpedo bombers that happened to be flying in from Trincomalee were shot down to the last aircraft. In the harbour the Japanese sank the armed merchant cruiser HMS Hector, the old destroyer HMS Tenedos and the Norwegian tanker Soli, and damaged several other ships, the wharves and the railway workshops. Bombs also fell on the mental hospital at Angoda, probably mistaken for the nearby fuel tanks at Kolonnawa. According to the figures cited in the literature, several dozen sailors and dock workers and about 37 civilians, most of them hospital patients, were killed ashore; Sri Lankan sources give somewhat different numbers. The port, however, was not paralysed. According to different tallies the British lost between 20 and 27 aircraft, including about 20 fighters; Japanese losses amounted to 7 aircraft, although the defenders claimed several dozen kills.
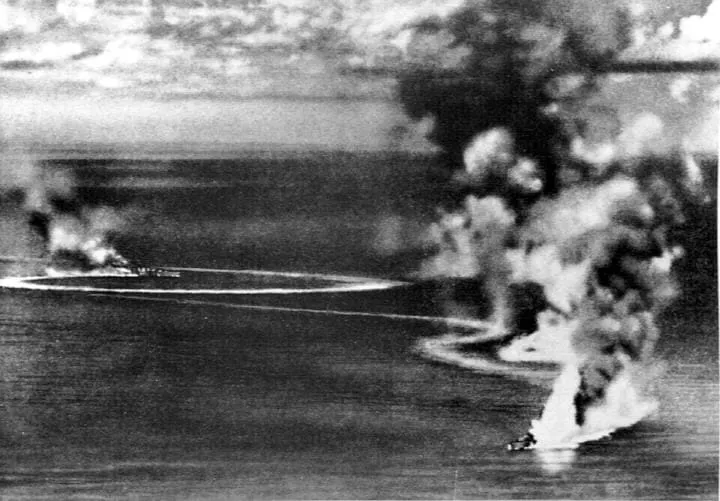
Nagumo did not find the fleet he was hunting in Colombo. Before noon, however, Japanese reconnaissance seaplanes from the cruisers spotted the two heavy cruisers steaming south-west to meet Force A. The carriers Akagi, Sōryū and Hiryū sent 53 dive-bombers against them under Lieutenant Commander Takashige Egusa. In the early afternoon the Vals attacked in their dives with an accuracy that Japanese aviators later likened to practice against a target ship. Dorsetshire sank within a few minutes, and Cornwall shortly afterwards. 424 sailors were killed (234 from Dorsetshire and 190 from Cornwall; some sources give 426). More than a thousand survivors waited in the water and on rafts for nearly 30 hours until they were picked up the next day by the cruiser Enterprise and two destroyers. The Japanese did not lose a single aircraft.
On the afternoon of 5 April the two fleets were little more than 100 nautical miles apart. At about 4 p.m. Albacores from Indomitable sighted the carriers Sōryū and Hiryū, but one was shot down and the other’s report was imprecise. Somerville was receiving conflicting information about the Japanese course, so in the evening he turned south-west and during the night searched for the enemy to the north-west, while Nagumo’s force was withdrawing to the south-east. Had Force A held its course, at about 9 p.m. it would have crossed the path of two Japanese carriers at a distance of about 20 miles. The British historian Andrew Boyd believes that Somerville came close that evening to a spectacular night attack – but also that he came close to losing his entire fleet in a daylight encounter with five carriers.
Course of events: the Bay of Bengal and Somerville’s withdrawal (6–8 April)
While Nagumo searched for the British fleet, Ozawa’s force ravaged shipping in the Bay of Bengal, which the British had practically nothing to defend with: the main body of the fleet was far to the south, and all that remained for escort duty were a few Indian sloops and a Greek destroyer. On 5 April Ozawa split his force into three groups which on 6 April, together with aircraft from Ryūjō, sank between 20 and 23 ships (depending on the tally) of more than 100,000 GRT in total off the coast of India, and damaged several more. Aircraft from Ryūjō also bombed the ports of Visakhapatnam and Kakinada; the damage was slight, but panic broke out and people fled the coast. Calcutta halted all sailings. On the same day Japanese land-based bombers sank the sloop HMIS Indus off the Burmese coast near Akyab. Amid the confusion the Japanese brought a convoy of troops and equipment safely into Rangoon. During April the submarines of the 2nd Squadron sank several more ships west of India and Ceylon.
On 6 April, the day of Somerville’s promotion to full admiral, Forces A and B joined up, and in the afternoon the survivors of Cornwall and Dorsetshire were picked up. Decrypted signals indicated that the Japanese had at least four carriers and three battleships – far more than the Eastern Fleet could attack without undue risk. Somerville returned cautiously, by a roundabout route from the west, to Addu Atoll, where he refuelled on 8 April. Nagumo’s force, meanwhile, had swung round to the south and east and was heading for the east coast of Ceylon. On the afternoon of 8 April it was spotted by yet another Catalina. Trincomalee was ordered to clear the harbour: Hermes, Vampire, the corvette Hollyhock and several auxiliaries were to be at least 40 miles to the south, down the coast, by dawn.
Course of events: Trincomalee and the sinking of Hermes (9–10 April)
On the morning of 9 April, after another Catalina had been shot down – though not before it had sighted the Japanese ships – 91 B5Ns armed with bombs and about 40 fighters arrived over Trincomalee. This time radar detected them in time and a dozen or so Hurricanes and six Fulmars took off, but the fight was once again unequal: the British lost eight Hurricanes and a Fulmar, and further aircraft were burnt out on the ground at China Bay airfield. The bombs destroyed workshops, stores and fuel tanks and damaged the monitor Erebus, while the merchant ship Sagaing, laden with aircraft and ammunition, burnt out alongside the quay. The Japanese lost four aircraft.
At about 10.30 a.m. nine Blenheims of No. 11 Squadron RAF, flying without fighter escort, reached the Japanese ships unobserved and bombed Akagi. None of the bombs hit, and the Zeros shot down five of the bombers, but this was the first time an organised air attack had fallen on Nagumo’s force, and the first sign that without radar its fighter cover might miss an approaching enemy. The same weakness proved fatal two months later at Midway.
At the time of the raid Hermes and Vampire were about 65 miles south of Trincomalee and had already turned back towards the port when they were spotted by a seaplane from the battleship Haruna. Hermes had no aircraft on board: her Swordfish had stayed ashore, and fighters from the island arrived too late. Some 80 dive-bombers, held in reserve in case the British fleet was found, attacked the two ships off Batticaloa before noon. Hermes, one of the first ships in the world designed from the outset as an aircraft carrier, took several dozen hits and sank within a quarter of an hour or so; 307 members of her crew were killed. The Australian destroyer Vampire sank soon afterwards with the loss of eight men, among them her captain, Commander William Moran. Further south, aircraft from Sōryū sank the corvette Hollyhock (53 dead) and the tanker Athelstane she was escorting, while other aircraft sank the tanker British Sergeant and the Norwegian merchant ship Norviken. The nearby hospital ship Vita, which the Japanese did not attack, picked up some 600 survivors. Fulmars arriving from Trincomalee shot down several Vals.
On the afternoon of 9 April Nagumo turned east, and on 10 April the fleet set course for the Andaman Islands and the Strait of Malacca; the commander of the submarines recalled them to Singapore on the same day. On 13 April the force passed Singapore, Shōkaku and Zuikaku detached and headed for the South Pacific, and the remaining ships began entering Japanese ports from 22 April. Somerville, meanwhile, sent the slow Force B to Kilindini, the port of Mombasa in Kenya, and Force A with the carriers to Bombay.
Losses
The British and their allies lost the carrier Hermes, two heavy cruisers, two destroyers (Tenedos and Vampire), a corvette, an armed merchant cruiser, a sloop and – counting the victims of Ozawa’s force, the submarines and the raids on the ports – several dozen merchant ships. According to a tally cited in British literature, 27 ships of more than 112,000 GRT were sunk in these waters in April 1942, although other sources give higher figures. About 40 British aircraft were destroyed, including roughly a third of the fighters based on Ceylon and almost all the aircraft intended for anti-ship strikes. Nearly 800 sailors died aboard the warships sunk off Ceylon alone, to which must be added the victims of the raids on Colombo and Trincomalee and the crews of the merchant ships that were sunk.
According to the most frequently cited figures, the Japanese carrier force lost 17 aircraft (10 Vals, 6 Zeros and 1 Kate) and about 30 aircrew; several dozen aircraft returned damaged. No ship of Nagumo’s or Ozawa’s forces was seriously damaged; the only serious loss suffered by the Japanese fleet in those days was the torpedoing of Naka off Christmas Island.
Significance
The raid was the last great victory of the Japanese carrier force in its original composition, and a demonstration of its power: in five days Japanese aviators sank an aircraft carrier and two heavy cruisers without losing a single ship. It made an enormous impression on British admirals and politicians. In his telegrams to Roosevelt Winston Churchill warned of the possible loss of Ceylon and of control of the western Indian Ocean, and with it the routes to Egypt, the Persian Gulf and India. For several months the Eastern Fleet abandoned the eastern part of the ocean: its main base became Kilindini in East Africa, and the carrier force operated from Bombay, venturing periodically into the central Indian Ocean. The Admiralty gave it top priority for reinforcements, and over the following months Ceylon received new squadrons of fighters and torpedo bombers and a better radar network.
The strategic aim of the Japanese, however, was to destroy the Eastern Fleet, and that they failed to achieve. Thanks to signals intelligence, Somerville’s caution and a measure of luck, his battleships and modern carriers survived, while Nagumo, whose reconnaissance was conducted by rote, failed to guess their presence even when British carrier aircraft appeared over his ships. The ships that were lost were sunk because Somerville, believing intelligence had been mistaken, had sent them into the very area the Japanese were then searching. Fear that the Japanese would return and make use of the ports of Vichy French Madagascar prompted the British to bring forward Operation Ironclad: on 5 May 1942 they landed at Diego Suarez, opening the fighting for Madagascar.
Japan had no intention of returning. The army refused to provide troops for an invasion of Ceylon, and the navy needed its carriers in the Pacific. The raid had cost the fleet several weeks of operations, wear on its aircraft and losses among experienced aviators, of whom Japan had been short from the start. In May Shōkaku and Zuikaku took part in the Battle of the Coral Sea, from which they emerged too damaged or depleted to fight in June at Midway, where Akagi, Sōryū and Hiryū were sunk (the Battle of Midway). From then on only Japanese submarines and raiders operated in the Indian Ocean, and Nagumo never again appeared in those waters. The raid also showed once more that ships without fighter cover were defenceless against carrier aircraft, and that the war at sea would be decided by reconnaissance and aircraft carriers rather than battleships.