- Category:
- Military operations
- Front:
- Mediterranean
- Date:
- 21 January 1941
- Author:
- Łukasz
- Battle:
- Operation Compass
- Tags:
- United Kingdom, Italy, Australia, Richard O’Connor
At dawn on 21 January 1941, after a night bombardment from the sea and a short artillery barrage, Australian infantry cut through the wire on the south-eastern sector of the perimeter of the fortress of Tobruk, and British Matilda infantry tanks drove through the breach. By evening Major General Iven Mackay’s 6th Australian Division had taken half the fortress, and its men had captured the commander of the defence, General Enrico Pitassi Mannella. The next morning the commander of the naval base, Rear Admiral Massimiliano Vietina, and the commander of the Sirte Division, General Vincenzo della Mura, surrendered, and in the afternoon the last Italian strongpoints laid down their arms. In a day and a half General Richard O’Connor’s XIII Corps, at a cost of some 400 men, had taken the most important port in eastern Cyrenaica and, according to the British official history, about 25,000 prisoners.
War chronologies record these events under three dates: on 7 January the offensive approaches Tobruk and the airfield is taken; on 12 January the British and Australian troops of XIII Corps prepare for the assault; and on 21 January they complete the capture of Tobruk. This account agrees with the sources in its main outlines, but two points need to be made more precise. The airfield at El Adem, some 25 kilometres south of Tobruk, was taken without a fight by the 7th Armoured Brigade as early as 5 January, and on 7 January Australian infantry arrived in front of the eastern sector of the perimeter and closed the ring. The assault began on 21 January, but the fortress did not fall that day: the last Italian units surrendered on the afternoon of 22 January.
After Bardia
Bardia capitulated on 5 January, but O’Connor did not wait for the last shots to die away there. That same morning the 7th Armoured Brigade set off westwards along the Trigh Capuzzo track, took the airfield at El Adem – an important Italian air force base in eastern Cyrenaica – without resistance, and pushed on to Acroma, cutting the road from Tobruk westwards towards Derna. On 6 January Brigadier Horace Robertson’s Australian 19th Infantry Brigade followed it, and before noon on 7 January deployed opposite the eastern sector of the fortifications. Tobruk was surrounded on the landward side. On 9 and 10 January Brigadier Arthur Allen’s 16th Infantry Brigade, the victor of Bardia, came up into position.
General Archibald Wavell, Commander-in-Chief Middle East, decided to take Tobruk above all for reasons of supply. Ever since the advance into Libya in mid-December, everything the troops at the front needed had had to be landed on makeshift jetties at Sollum and carried by lorry across the desert, and every kilometre of the advance westwards lengthened the route. According to Gavin Long’s Australian official history, Wavell and O’Connor reckoned that if the port of Tobruk fell into their hands in good condition, most supplies could be brought from Egypt by sea, and the armoured division and the infantry would gain a base for a further advance. Tobruk had the best natural harbour on the coast between Alexandria and Benghazi: a deep bay sheltered from the sea by a headland, with quays, warehouses and water-distillation plants.
The fortress
Tobruk, a small town of white houses on the bay, was an important Italian military and naval base in eastern Libya. On the landward side it was enclosed by a semicircular perimeter of fortifications measuring, by various reckonings, some 48–54 kilometres – almost twice as long as at Bardia. It consisted of two rows of concrete, partly underground posts, protected by wire entanglements a metre and a half high. The outer posts were 550–750 metres apart, the inner ones about 450 metres behind them. Long counted 128 of them on the perimeter, against about 80 at Bardia. In front of them ran an anti-tank ditch, unfinished along part of its length, while minefields and lines of booby traps – explosive charges linked by wire stretched low above the ground – protected the approaches.
The defence was commanded by General Enrico Pitassi Mannella, commander of XXII Corps. The core of the garrison was General Vincenzo della Mura’s 61st Infantry Division Sirte, reinforced by battalions of the Fascist Militia, frontier guards, fortress artillery and the remnants of units routed in December. British intelligence estimated the Italian forces at about 25,000 men, including 7,000 garrison and depot troops, with some 220 guns, 45 light tanks and 20 medium tanks. According to later calculations the garrison numbered about 22,000 men and had some 340 guns. The battalion of M11/39 medium tanks was in poor shape: most of these unreliable, obsolete vehicles had been dug in as static pillboxes, and only a few remained in running order. The naval base and the harbour defences were commanded by Rear Admiral Massimiliano Vietina, who had several thousand sailors under him.
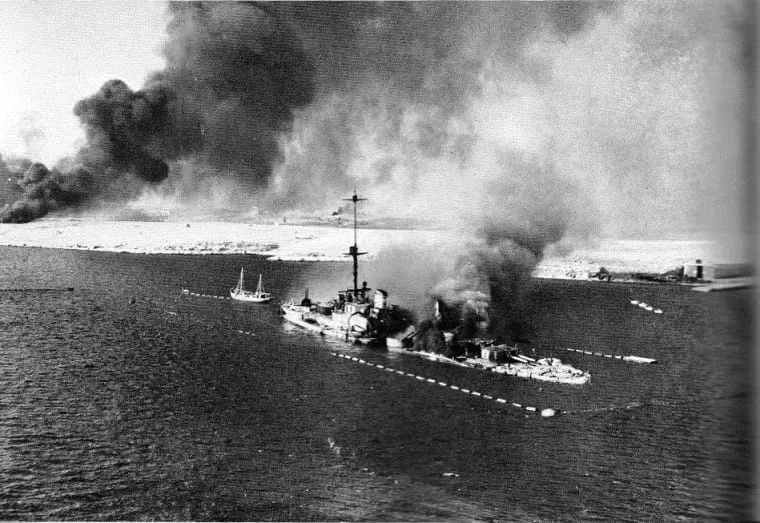
Lying aground in the harbour was the old armoured cruiser San Giorgio, launched in 1908 and serving since the spring of 1940 as a floating battery. Her anti-aircraft guns defended the port against RAF raids, and in June 1940 it was her fire that had started the shooting in which Marshal Italo Balbo was killed. Now the ship’s heavy guns were to support the defence on the landward side.
The garrison could expect no help. On 9 January Marshal Rodolfo Graziani, Commander-in-Chief in Libya, warned Pitassi Mannella that there would be no relief. The remnants of the 10th Army under General Giuseppe Tellera, who in December had replaced the recalled General Berti, stood far to the west, on a line from Derna to Mechili, and the only fresh force was a brigade of M13/40 medium tanks being sent from Italy. Benito Mussolini, as in the case of Bardia, expected the fortress to hold out as long as possible and buy time for reinforcements to be sent. General Annibale Bergonzoli, who had escaped from Bardia on foot with a group of officers and reached Tobruk, did not stay there: he was given a new command over the troops near Derna.
Two weeks of preparation
Two weeks passed between the closing of the ring and the assault. O’Connor and Mackay knew from their experience at Bardia that such a fortress could not be taken on the march, and for the attack artillery ammunition, fuel and water had to be brought up and worn-out tanks repaired. British supply lines were stretched to the limit: according to British figures, about 350 tons of supplies a day passed through Sollum at the beginning of January and about 500 tons at the end of the month, and from there everything went by lorry, including captured Italian ones.
From 6 to 15 January Australian patrols crept up to the fortifications every night, cutting gaps in the wire, checking the depth of the ditch and reconnoitring the posts. The sappers discovered that about a hundred metres in front of the anti-tank ditch ran a line of booby traps: explosive charges in tins, set three metres apart and linked by green wire stretched a dozen or so centimetres above the ground. The soldiers lived in holes dug in the stony ground, plagued by dust, lice and desert sores. They received half a gallon of water a day, about two and a half litres, until a well with water for washing was found at El Adem.
The date of 12 January, under which the preparations for the assault are listed, captures those days well, although it is not tied to any single event. On 13 January, at a conference at divisional headquarters, the decision was taken to attack near Post 57 on the south-eastern sector of the perimeter. On 17 January Mackay presented a detailed plan to the brigade commanders and the commander of the 7th Royal Tank Regiment. O’Connor initially set the attack for 20 January, but at Brigadier Allen’s request it was postponed by a day: the commander of the 16th Brigade wanted more time to prepare, and the tank crews hoped to get more Matildas running. They had been promised a mere thirteen.
The plan repeated the pattern that had worked at Bardia. Under cover of a barrage by 88 guns, the 16th Brigade, led by the 2/3rd Battalion, was to hack a gap in the perimeter on the sector of Posts 55 to 59, and the tanks and further battalions were to pass through the breach, widen it in both directions and destroy the batteries in depth. Then the 19th Brigade was to go through the same gate and strike west and north, towards Fort Pilastrino and Fort Solaro and towards the town. Brigadier Stanley Savige’s 17th Brigade was to pin down the defenders with a demonstration on the eastern sector, while the Support Group of the 7th Armoured Division harassed the western sector with fire without becoming engaged. After the breakthrough the armoured division was to move west towards Mechili, and the infantry along the coast road. The Australian divisional cavalry even fielded a squadron of captured Italian tanks, with large white kangaroos painted on their sides to tell them apart.
In those same days the situation in the Mediterranean was turning against the British. On 10 January German dive bombers from Sicily badly damaged the aircraft carrier HMS Illustrious: the Luftwaffe’s X Air Corps had entered the fight. In mid-January Wavell and the Air Officer Commanding-in-Chief Middle East, Air Chief Marshal Arthur Longmore, held talks in Athens with Prime Minister Ioannis Metaxas about aid to Greece, for which Wavell would have had to detach troops from Africa. The Greeks at the time turned down the offer of small British forces, judging that they would provoke Germany without being enough to stop it. On 19 January Hitler and Mussolini met at the Berghof, where agreement was reached on German help for the Italians in North Africa.
The assault of 21 January
On the night of 20–21 January Tobruk was bombarded from the sea by the monitor HMS Terror and several smaller ships of Admiral Andrew Cunningham’s Mediterranean Fleet, and over the two previous nights RAF Wellingtons and Blenheims had dropped some 20 tons of bombs on the fortress. At 5.40 a.m. the artillery opened fire. When the barrage lifted into the depth of the defences at 6.05, the 2/3rd Battalion went into the attack. Just short of the ditch it ran into the line of booby traps: the explosions killed three men and wounded a dozen or so, among them a platoon commander. Even so, Sergeant Sayers and the rest of the platoon reached Post 57 before the Italians could get out of their shelters and took it without firing a shot. The sappers blew the wire, filled in the ditch and marked the lanes. By 6.45 the Australians held five posts and a breach about one and a half kilometres wide.
At seven o’clock eighteen Matildas of the 7th Royal Tank Regiment – five more than had been feared – drove through the gate. Behind them came the 2/1st Battalion, which advanced eastwards along the perimeter and in two and a half hours took more than twenty posts, and Lieutenant Colonel Frederick Chilton’s 2/2nd Battalion, which struck into the depth of the defences, towards the triangle between the Bardia and El Adem roads where the Italian artillery stood. Some Italian gunners fired until the last moment, but by 9.10 the battalion had taken ten batteries.
At 8.40 the 19th Brigade passed through the breach. The 2/11th Battalion reached the escarpment overlooking the town and the harbour without loss, whereas the 2/4th and 2/8th Battalions met stiffer resistance at the road junction and Fort Pilastrino. The 2/8th Battalion had to take a dozen or so dug-in M11/39 tanks that the Italians had turned into bunkers. In the early afternoon the Italians threw their mobile reserve into a counter-attack: according to Long, nine medium tanks and several hundred infantrymen. The Australians halted it with anti-tank rifle and gun fire, and Private Neall knocked out the three leading vehicles with an anti-tank rifle. The fighting for Pilastrino was the heaviest of the whole battle, and the 2/8th Battalion, which since half past four in the morning had fought its way forward some thirty kilometres, lost many officers and NCOs.
In the afternoon the 2/4th Battalion, approaching Fort Solaro, came upon the entrances to tunnels housing a large headquarters. An Italian officer announced that the “commandant” was inside and would surrender only to an officer. Lieutenant Copland went down into the tunnel. According to the account quoted by Long, the general, with tears in his eyes, handed over his pistol. “C’est la guerre,” said the Australian. “Oui, c’est la guerre,” replied Pitassi Mannella. Taken to Brigadier Robertson, however, he refused to issue an order to cease fighting, saying that his troops had orders to fight to the end. Some accounts give 22 January, when the rest of the garrison capitulated, as the day of his capture. By nightfall the Australians had occupied the eastern and southern halves of the fortress. During the night only the sound of explosions came from the direction of the town and the harbour: the Italians were blowing up their ammunition and fuel dumps.
22 January: capitulation
Before dawn on 22 January, at about 4.15, Rear Admiral Vietina ordered the captain of San Giorgio, Stefano Pugliese, to blow up the ship’s magazines so that she would not fall into enemy hands. The cruiser burst into flames and settled on the bottom of the bay. The Italians also scuttled the ships Marco Polo and Liguria in the harbour, and smoke from the burning depots hung over the bay. For the defence of Tobruk the ship was later awarded the Gold Medal of Military Valour.
In the morning Italian officers came out in front of the lines of the 2/8th Battalion with the news that General della Mura wished to surrender. After brief haggling over whether he could capitulate to an officer of lower rank, the commander of the Sirte Division gave himself up to Major Key, followed by a column of several thousand officers and men from the Pilastrino area. At the same time Lieutenant Hennessy’s carriers drove down the road above the harbour and came upon the naval headquarters. Admiral Vietina, surrounded by his staff, wanted to hand over his sword to the young officer, who declined it and sent for Brigadier Robertson. According to Long, Robertson asked first of all about mines and booby traps, and then accepted the surrender of the admiral and some 1,500 sailors. One of the Australians ran his slouch hat, the emblem of the Australian infantry, up the flagpole in front of the admiral’s headquarters. Scattered strongpoints on the western sector of the perimeter went on surrendering throughout the day. The last laid down its arms at about 4 p.m.
The reckoning
According to the British official history, some 25,000 soldiers, including about 2,000 sailors, were taken prisoner at Tobruk, and 208 field and medium guns and 87 tanks, most of them light, were captured. Long adds that about 27,000 men were later counted in the prisoner-of-war cage, while cautioning that exact figures are hard to come by in such conditions. According to Italian data, 18 officers and about 750 men were killed and about 2,300 wounded. The losses of XIII Corps amounted to about 400 men, 355 of them Australians: 49 killed and 306 wounded.
The most valuable prize was the port itself. Despite the damage and the wrecks, the main quay was almost untouched, and intact schooners, pontoons and motor boats remained in the bay. Royal Navy minesweepers cleared the approaches, and on 24 January the port received its first ships; three days later it was largely working. The distillation plants and wells were also undamaged, producing, according to Long, some 40,000 gallons – more than 180,000 litres – of water a day. In the storehouses the Australians found stocks of tinned food which, by their reckoning, would have lasted the Italian garrison two months, and thousands of cases of mineral water.
More than 20,000 prisoners were crammed into an enclosure measuring roughly 730 by 370 metres at the junction of the Bardia and El Adem roads. For more than six weeks, according to Long, it held no fewer than 7,000 and at times more than 20,000 men, in the dust and without shelter. At first each man received a tin of bully beef, two biscuits and a bottle of water a day, and the issuing of the rations alone took seven hours. The prisoners were gradually sent on to Egypt and from there to camps in India, Australia and other parts of the Empire. Pitassi Mannella, della Mura and Vietina were among those taken into captivity. Pitassi Mannella returned from a camp in India only in 1946.
Its place in the war
The capture of Tobruk was the second great victory of the 6th Australian Division, after Bardia, and the last assault on a fortress in Operation Compass. Mussolini’s decision to defend both fortresses to the end meant that the Italians lost both garrisons in less than three weeks without gaining much time. According to Long, since the beginning of December nearly half of the 250,000 soldiers of the Italian 10th and 5th Armies in Libya had been killed or captured. On the same day, 21 January, Prime Minister Winston Churchill and the Chiefs of Staff decided that the offensive was to continue and that the capture of Benghazi was of “the highest importance”.
The port of Tobruk solved XIII Corps’ most pressing supply problems for a time and allowed O’Connor to push on almost at once. As early as 24 January his tanks clashed with an Italian armoured brigade at Mechili, and at the end of the month the Italians abandoned Derna. On 7 February the remnants of the 10th Army capitulated at Beda Fomm. The defeat, of which Tobruk was an important stage, convinced Adolf Hitler that without German help Mussolini would lose Libya. On 12 February General Erwin Rommel, commander of the new Afrika Korps, flew into Tripoli.
For Tobruk, January 1941 was only the beginning. When Rommel recaptured almost the whole of Cyrenaica in the spring, the fortress taken by the Australians remained in British hands and from April 1941 withstood a siege lasting eight months. It was defended mainly by the Australians of Major General Leslie Morshead’s 9th Division, dubbed by German propaganda the Rats of Tobruk, and from August also by the Polish Independent Carpathian Rifle Brigade. The siege was lifted in December 1941 by the British Operation Crusader. In June 1942, after the Battle of Gazala, Tobruk fell in a single day, and more than 30,000 soldiers of the British Empire were taken prisoner. The port that in January 1941 had been the reward for victory became for a year and a half one of the symbols of the war in North Africa.
Sources
Meanwhile
(04)Elsewhere, within a week.
- 19 January 1941 · AfricaThe British offensive in East AfricaOn 19 January 1941 British and Indian troops entered Kassala, abandoned by the Italians, and pushed into Eritrea. The offensive on Italian East Africa began.
- 17 January 1941 · Far EastThe Battle of Ko ChangOn 17 January 1941 a French squadron from Indochina surprised Thai warships off Ko Chang island and routed them without loss. It did not decide the war.
- 15 January 1941 · Far EastThe New Fourth Army incidentIn January 1941 Kuomintang troops crushed the Communist New Fourth Army’s headquarters in southern Anhui. Ye Ting was captured; the united front was dead.
- 14 January 1941 · SocietyThe V for Victory campaignOn 14 January 1941 Victor de Laveleye urged listeners of Radio Belgique to paint the letter V on walls. The sign soon spread across occupied Europe.
Related events
(04)The same battle, people or subject.
- 7 February 1941 · MediterraneanThe Battle of Beda FommOn 5–7 February 1941 the British 7th Armoured Division cut off the 10th Army fleeing Cyrenaica at Beda Fomm. On 7 February its remnants gave up; Tellera died.
- 5 January 1941 · MediterraneanThe capture of BardiaOn 5 January 1941 General Mackay’s Australians broke the last resistance at Bardia. Some 36,000–40,000 Italians were captured, but Bergonzoli escaped to Tobruk.
- 30 January 1941 · MediterraneanThe British take DernaOn 30 January 1941 Australians entered Derna unopposed. After a week of stubborn defence on the Wadi Derna, the Italians withdrew to avoid encirclement.
- 16 December 1940 · MediterraneanThe British enter LibyaOn 16 December 1940 the Italians gave up Sollum, Fort Capuzzo and Sidi Omar and shut themselves in Bardia. The British entered Libya and began to encircle it.