1940–1943: The North African campaign
Operation Compass
- Dates:
- 9 December 1940 – 9 February 1941
- Front:
- Mediterranean
- Location:
- The Western Desert in Egypt and Cyrenaica in Libya: the camps around Sidi Barrani (Nibeiwa, Tummar, Maktila), Sollum and the Halfaya Pass, Fort Capuzzo, Bardia, Tobruk, Mechili, Derna, Benghazi, Beda Fomm and El Agheila on the Gulf of SirteOn the battle map →
- Sides:
- United Kingdom (with Indian, Australian and New Zealand troops)Archibald Wavell, Richard O'ConnorItaly (with colonial divisions from Libya)Rodolfo Graziani, Annibale Bergonzoli, Giuseppe Tellera
- Result:
- Decisive British victory. In two months the Western Desert Force (XIII Corps from 1 January 1941) advanced some 800 kilometres, destroyed the Italian Tenth Army and occupied the whole of Cyrenaica. According to the British official history it took 133,298 Italian and Libyan prisoners and captured some 400 tanks and 845 guns, for the loss of about 1,900 killed, wounded and missing.
- Author:
- Łukasz
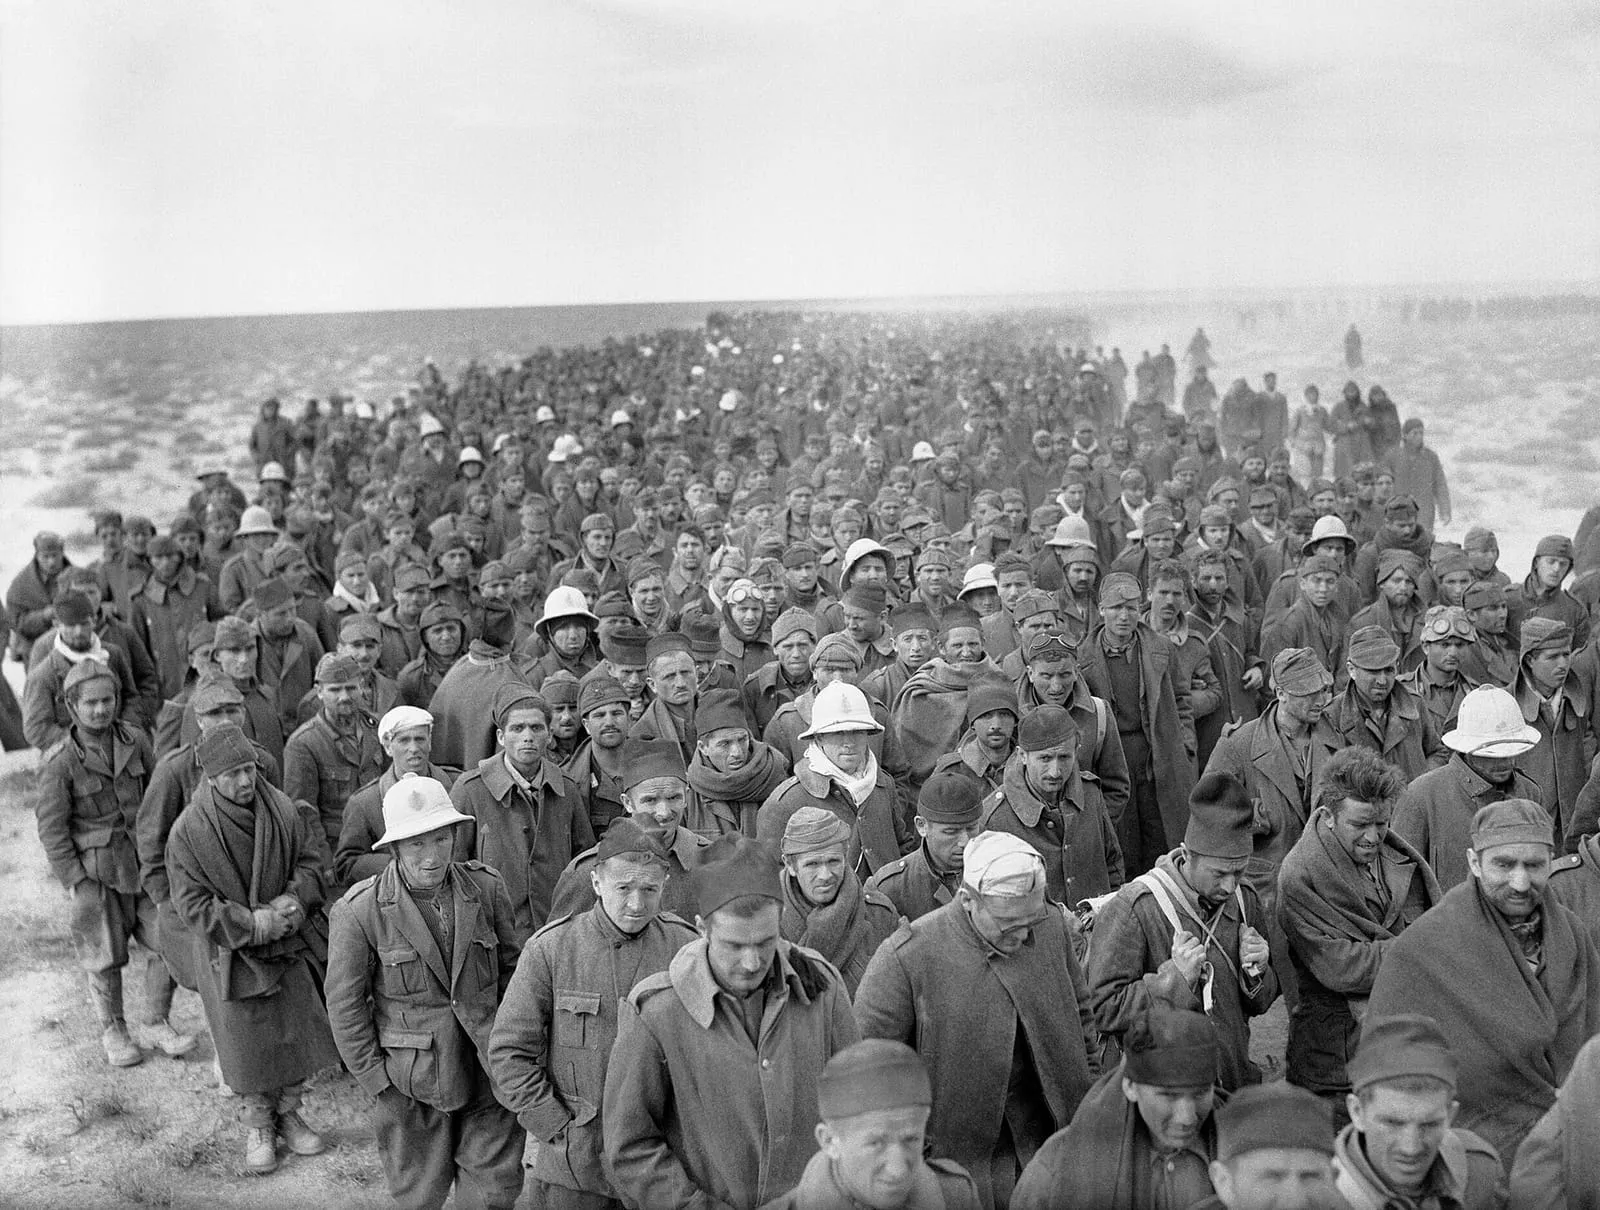
Operation Compass was the first great British offensive of the Second World War and Britain’s first great land victory of the war. Conceived by General Archibald Wavell, Commander-in-Chief Middle East, as a raid of a few days on the Italian camps around Sidi Barrani, it grew into a counter-offensive that within two months threw the Italians out of Egypt and took from them the whole of Cyrenaica, the eastern province of Libya. The Western Desert Force of General Richard O’Connor, some 31,000–36,000 strong, routed the Tenth Army of Marshal Rodolfo Graziani, which had about 150,000 men in Egypt and Cyrenaica.
The campaign comprised several major engagements: the battle for the camps around Sidi Barrani (9–11 December 1940), the pursuit to the Libyan frontier, the capture of the fortresses of Bardia (3–5 January 1941) and Tobruk (21–22 January), the fighting at Mechili and Derna, and the Battle of Beda Fomm (5–7 February), in which the remnants of the Tenth Army were cut off and forced to surrender. The victory did not, however, end the war in Africa. The British halted at the gates of Tripolitania when the government in London decided to send its best units to Greece, and German troops under Erwin Rommel began to arrive in Libya.
Name and dates
“Compass” was the British codename for the operation. English-language literature uses it for the whole campaign from December 1940 to February 1941, although its first part, the fighting for the camps around Sidi Barrani, is also called the Battle of Sidi Barrani. The Italians speak of the Battle of Marmarica (battaglia della Marmarica) or, more broadly, of the first British offensive in North Africa.
The start is usually put at 9 December 1940, the day of the assault on the camp at Nibeiwa. Preparations began earlier: units of the 4th Indian Infantry Division set out from the Mersa Matruh area on the night of 6–7 December, believing they were going on a second exercise, and on the night of 7–8 December the whole Western Desert Force began its march to start lines more than a hundred kilometres away. For this reason some studies, Italian ones among them, date the start of the operation to 8 December. The end is put at 9 February 1941, when the armoured cars of the 11th Hussars reached El Agheila on the border between Cyrenaica and Tripolitania and the advance was halted. The remnants of the Tenth Army had surrendered at Beda Fomm on 7 February.
Background
Three months at Sidi Barrani
In September 1940, after Italy’s entry into the war and the death of Marshal Italo Balbo, the Tenth Army advanced from Libya into Egypt, took Sollum and, after a four-day march, halted at Sidi Barrani, about 95 kilometres from the frontier and 130 kilometres short of the main British position at Mersa Matruh. Graziani, who had taken command in Libya and advanced under pressure from Benito Mussolini, had no intention of going further until he had built a road and a water pipeline. His divisions were spread in a wide arc of fortified camps: at Maktila on the coast, at Tummar East and Tummar West, at Nibeiwa and, on the escarpment towards the desert, around Sofafi and Rabia. A second echelon held Buq Buq, Sollum, the Halfaya Pass and Sidi Omar. The camps were strong but separated by gaps many kilometres wide, the widest of which lay between Nibeiwa and Sofafi.
According to Italian and British studies, the Tenth Army had about 80,000 men, 250 guns and 120 tanks in Egypt, some 40,000 of them in the Sidi Barrani area itself. The camps at Maktila and Tummar were held by the 1st and 2nd Libyan Divisions, made up of Libyan soldiers under Italian officers; at Nibeiwa stood the motorised group of General Pietro Maletti, with Libyan battalions and M11/39 medium tanks; at Sidi Barrani the 4th Blackshirt Division “3 Gennaio”; on the escarpment the “Cirene” division; and at Buq Buq the “Catanzaro” division. Further back, near the frontier, stood units of General Annibale Bergonzoli’s XXIII Corps. The commander of the Tenth Army, General Mario Berti, was on sick leave in Italy, and his place was taken by General Italo Gariboldi, whose headquarters lay far to the rear, at Bardia. Graziani set the advance on Mersa Matruh for mid-December.
It was an infantry army, short of lorries, radio communications and effective anti-tank weapons. The L3 light tanks were in effect tankettes, the Libyan divisions had only just been formed, and the Blackshirt divisions, that is, units of the Fascist Militia, were poorly trained.
The British regain the initiative
Wavell, responsible for an area stretching from Libya to Iraq and Kenya, was in a difficult position. In August he had lost British Somaliland, and the Prime Minister, Winston Churchill, was pressing him to act more vigorously. Despite the Battle of Britain, however, the British government sent reinforcements to the Middle East in the summer and autumn, among them three tank regiments shipped round Africa, one of them equipped with Matilda II heavy infantry tanks. Their armour could not be pierced by the Italian 47 mm anti-tank guns or by light field guns. Units from India, Australia and New Zealand were also reaching Egypt.
The long pause at Sidi Barrani gave the British time. Patrols of the 11th Hussars and the 7th Support Group dominated no man’s land, and ground and air reconnaissance thoroughly mapped the Italian camps and the gaps between them. The Mediterranean Fleet of Admiral Andrew Cunningham, which in July had won the Battle of Calabria and on 11 November had struck at Taranto with aircraft from the carrier HMS Illustrious, controlled the eastern Mediterranean and bombarded Italian positions on the coast.
After the Italian attack on Greece, London sent aid to the Greeks, withdrawing RAF squadrons and anti-aircraft guns from Egypt. Greek resistance, however, showed that Mussolini’s army was weaker than it had seemed.
Plan and forces
The “five-day raid”
On Wavell’s instructions the plan was drawn up by the commander of British troops in Egypt, General Henry Maitland Wilson, and by O’Connor, who commanded the Western Desert Force. Wavell had noticed that the Italian camps were too far apart to support one another. The blow was to go through the gap between Nibeiwa and Sofafi and fall on the camps from the rear, from the west, where the Italians did not expect it. For lack of water and transport the operation was planned as a raid lasting four or five days. On 28 November, however, Wavell wrote to Wilson that although he did not entertain “extravagant hopes”, he wanted to be sure that if a big opportunity arose, the army would be prepared “morally, mentally and administratively” to exploit it to the full.
The plan was simple. The 7th Support Group was to watch the camps on the escarpment around Sofafi and prevent their garrisons from joining the battle. The 4th Indian Infantry Division, with a battalion of Matilda tanks of the 7th Royal Tank Regiment (7th RTR), was to take Nibeiwa and then both camps at Tummar. The 7th Armoured Division covered it from the west and was to cut the road from Sidi Barrani to Buq Buq. On the coast Selby Force, a group of about 1,800 men from the Mersa Matruh garrison under Brigadier Arthur Selby, was to pin down the camp at Maktila, and Royal Navy ships were to bombard Maktila and Sidi Barrani. Secrecy was strict. On 25 and 26 November exercises were held near Mersa Matruh against mock-ups of the camps at Nibeiwa and Tummar, but only a few officers knew what they really represented. The soldiers were told that a second exercise awaited them; many learned the truth only on 7 December, at their start lines.
Forces of the two sides
According to various studies, O’Connor had between 31,000 and 36,000 men, some 120 guns and 275 tanks. The core of his force was the 7th Armoured Division of General Michael O’Moore Creagh and the 4th Indian Infantry Division of General Noel Beresford-Peirse, reinforced by the British 16th Infantry Brigade. Air support was provided by No. 202 Group RAF under Air Commodore Raymond Collishaw, with about 160 aircraft, including Hurricane and Gladiator fighters and Blenheim and Wellington bombers. From the sea the operation was supported by the monitor HMS Terror and the gunboats Aphis and Ladybird.
On the Italian side, according to the British official history, there were about 150,000 men in Egypt and Cyrenaica, 1,600 guns, more than 600 tanks and tankettes, and some 330 aircraft of the 5th Air Fleet (5a Squadra) of the Regia Aeronautica.
Course of the fighting
9 December: Nibeiwa and Tummar
On the night of 8–9 December RAF bombers circled over the Italian positions, their drone masking the movement of the columns, while the monitor Terror and the gunboat Aphis shelled Maktila and the Ladybird shelled Sidi Barrani. At 5 a.m. on 9 December an artillery detachment opened fire on Nibeiwa from the east to distract the defenders, and at 7.15 a.m. the main artillery preparation began. Moments later the Matildas of 7th RTR drove into the camp from the north-west, where reconnaissance had found its weakest sector, followed by the infantry of the 11th Indian Infantry Brigade, jumping down from their lorries. Surprise was complete. According to British accounts, 28 Italian M11/39 tanks parked outside the camp were destroyed before their crews could reach them.
The defenders fought bravely, and the gunners fired at the tanks at close range, but their shells bounced off the Matildas’ armour. Maletti was killed in the fighting. By 8.30 a.m. the camp had been taken. According to the Italian official history, about 820 men were killed and 1,338 wounded; some 2,000 were taken prisoner. The British, by their own figures, lost 56 men.
After refuelling and rearming, the tanks moved north. At 1.50 p.m., after an hour’s bombardment, they attacked Tummar West, held by the 2nd Libyan Division. Resistance was stronger here, but by 4 p.m. the camp had fallen, apart from its north-eastern corner. By nightfall the British had also taken most of Tummar East. The light tanks of the 7th Hussars cut the road from Sidi Barrani to Buq Buq.
10–11 December: Sidi Barrani
On the coast Selby Force tried to cut Maktila off from the west, but the 1st Libyan Division slipped away during the night and fell back towards Sidi Barrani. Part of its column, pursued by Selby, was driven on to the dunes by the sea, where late in the afternoon of 10 December, in a sandstorm, it was routed by the cruiser tanks of the 6th Royal Tank Regiment. Meanwhile the British 16th Infantry Brigade, brought forward from the 4th Indian Division’s reserve, drove in lorries up to Sidi Barrani from the south and south-west. At 4 p.m., supported by the divisional artillery and Matildas, it attacked the settlement and took it by nightfall.
The remnants of both Libyan divisions and of the “3 Gennaio” division were trapped on a strip of coast between the 16th Brigade and Selby Force. At dawn on 11 December mass surrenders began. The longest resistance, until early afternoon, was put up by two battalions of the 2nd Libyan Division on the Ras el Dai hill (Point 90), after which some 2,000 men surrendered. In the evening the “3 Gennaio” division laid down its arms. That night the “Cirene” division abandoned the camps on the escarpment at Rabia and Sofafi and slipped away along the escarpment towards Halfaya. The order to the 4th Armoured Brigade to cut it off came too late. The 7th Armoured Brigade, on the other hand, destroyed most of the “Catanzaro” division at Buq Buq, taking thousands of prisoners and dozens of guns.
The results of the first three days exceeded all expectations. According to the British official history, by 11 December the Western Desert Force had taken some 38,300 prisoners, 237 guns and 73 tanks, for the loss of 624 men: 133 killed, 387 wounded and 8 missing. Italian losses in killed and wounded are estimated at about 2,200 dead and 2,300 wounded. There were twenty times as many prisoners as had been anticipated.
12–16 December: from Egypt into Libya
After the capture of Sidi Barrani the 7th Armoured Division set off in pursuit, one brigade along the coast and the other across the plateau above the escarpment. By the evening of 12 December all that the Italians still held in Egypt were the approaches to Sollum and the Sidi Omar area.
On 11 December Wavell took a decision that surprised O’Connor: the 4th Indian Division, the victor of Nibeiwa, was withdrawn from the front and shipped to the Sudan, where it was to take part in the offensive against the Italians in Eritrea as part of the East African campaign. In its place came General Iven Mackay’s 6th Australian Division, untried in battle but well trained. For several days O’Connor had practically only one armoured division and the 16th Brigade at the front.
Graziani, convinced that the British had overwhelming superiority, on 14 December ordered the units on the frontier to concentrate and fall back to more defensible positions. Bergonzoli argued that without them he could not defend Bardia, and the marshal ordered them into the fortress. The Italians abandoned Sollum, the Halfaya Pass, Fort Capuzzo and Sidi Omar, and the troops from Capuzzo slipped past the 7th Armoured Brigade in the darkness. On 16 December the British occupied Sollum, a small port that henceforth became their main unloading point, and the Halfaya Pass; in the same days they took Fort Capuzzo and Sidi Omar on the Libyan side of the frontier. The last Italian soldiers left Egypt.
Bardia, 3–5 January 1941
The fortress of Bardia, ringed by a belt of fortifications almost 30 kilometres long with an anti-tank ditch, wire entanglements and dozens of concrete positions, was defended by the XXIII Corps of Bergonzoli, known to his soldiers as “Electric Whiskers” (Barba Elettrica). He had gathered there the remnants of four divisions that had withdrawn from the frontier, together with the “23 Marzo” division – in all, according to various sources, between about 40,000 and 45,000 men and more than 400 guns. Mussolini wrote to him that he was entrusting him with the task of defending the fortress “to the last”, and Bergonzoli replied: “In Bardia we are, and here we stay.” The Duce hoped that every day of resistance would buy time to send reinforcements from Italy.
Before the attack the fortress was shelled from the sea and bombed from the air for more than a week. On 1 January 1941 the Western Desert Force was renamed XIII Corps. Mackay, who had taken command in the Sollum area on 21 December, prepared the assault carefully, like an attack on First World War fortifications. The date was put back from 2 to 3 January to bring up artillery ammunition.
At dawn on 3 January, after an artillery barrage, the 16th Australian Brigade attacked the western sector of the perimeter. Sappers blew gaps in the wire with Bangalore torpedoes and filled in the anti-tank ditch with shovels, and 23 Matildas of 7th RTR went in through the breaches. At the same time the battleships HMS Warspite, Valiant and Barham shelled the northern part of the fortress. By midday the Australians had taken some 8,000 prisoners. On 4 January the 16th Brigade entered the small town of Bardia and cut the fortress in two, and on 5 January the 19th Brigade, supported by six surviving Matildas, took the southern sector. The troops in the north surrendered to the 16th Brigade and the 7th Support Group. Bergonzoli and a group of officers slipped out of the fortress and walked some 120 kilometres to Tobruk.
According to the British official history, the Italians lost more than 40,000 men killed and captured at Bardia, more than 400 guns, 13 medium and 117 light tanks and hundreds of vehicles; Italian studies speak of about 38,000 prisoners. The 6th Australian Division lost 456 men. It was the Australian Army’s first major battle of the war.
Tobruk, 21–22 January
The defeat set off a wave of changes in the Italian command. Berti, who had returned from leave, was dismissed by Graziani on 23 December, and command of the Tenth Army passed to his chief of staff, General Giuseppe Tellera. According to an Italian account, Tellera told a colleague that he knew he was going to his death.
On 5 January, even before resistance at Bardia had ceased, the 7th Armoured Brigade moved west towards El Adem, and by 9 January Tobruk was surrounded. The fortress commander, General Enrico Pitassi Mannella, learned from Graziani that no relief would come. The perimeter was almost twice as long as at Bardia, and the defenders, about 25,000 men, were half as many. In the harbour lay the old armoured cruiser San Giorgio, whose guns supported the defence.
On the night of 20–21 January the Terror bombarded the fortress from the sea. At dawn on 21 January the Australian infantry, again supported by Matildas and sappers, broke through the perimeter in the south-eastern sector, and by evening held half of Tobruk. On the night of 21–22 January the Italians blew up the San Giorgio in the harbour; the fortress commander, Pitassi Mannella, was taken prisoner (on the afternoon of 21 January according to the Australian official history, on 22 January according to other accounts); and in the afternoon the last pockets of resistance capitulated. According to the British official history some 25,000 prisoners were taken, including 2,000 sailors, together with 208 field and medium guns and 87 tanks. XIII Corps lost just over 400 men, 355 of them Australians.
Mechili and Derna, 24–30 January
Beyond Tobruk the way was barred by the Jebel Akhdar (the “Green Mountain”) range. The Italians held a line from Derna on the coast to Mechili on the edge of the desert. It was defended by the corps of Bergonzoli, who had been given a new command after his escape from Bardia, with the “Sabratha” infantry division and General Valentino Babini’s Special Armoured Brigade, which had M13/40 medium tanks freshly arrived from Italy. On 24 January a tank engagement took place at Mechili: Babini’s tanks surprised the 7th Hussars and inflicted losses on them, but a counter-attack by the 2nd Royal Tank Regiment destroyed seven M13s. At Derna the Australians fought hard for several days against the “Sabratha” division and Bersaglieri.
Tellera, however, could not hold the British on this line. On the night of 26–27 January the Italians withdrew from Mechili, and when raiding columns of the 11th Hussars began to encircle Derna from the south, Bergonzoli ordered a retreat. Derna was occupied without a fight on 29–30 January. On 31 January Graziani, fearing that the whole army would be cut off and that the population of Cyrenaica – whose resistance he himself had bloodily suppressed at the turn of the 1920s and 1930s – would rise, ordered the evacuation of Cyrenaica and a retreat to Tripolitania along the coastal Via Balbia, through Benghazi.
Beda Fomm, 5–7 February
At the end of January the British learned that the Italians were evacuating Cyrenaica. The Australians’ pursuit along the coast road through the mountains could not cut off the Tenth Army. O’Connor therefore decided on a manoeuvre that has gone down in the history of armoured warfare. On 4 February the 7th Armoured Division, by now badly worn, set out from Mechili straight across the desert, south of the mountains, via Msus and Antelat, to cut the Via Balbia south of Benghazi before the Italian columns got there. The tanks moved slowly over the stony ground, so Creagh sent ahead a fast wheeled column, Combe Force under Lieutenant Colonel John Combe, some 2,000 men with armoured cars, motorised infantry and a dozen or so guns.
Combe Force reached the Via Balbia at Sidi Saleh, about 30 kilometres north of Ajdabiya, early in the afternoon of 5 February and at once set up a roadblock. About half an hour later the head of the Tenth Army arrived. In the evening the 4th Armoured Brigade struck the flank of the Italian columns, which stretched for dozens of kilometres along the road near the settlement of Beda Fomm.
On 6 February the Italians attacked the roadblock and the flanks of the British position again and again, throwing in Babini’s tanks and artillery, but the attacks were poorly coordinated and made piecemeal, as the columns arrived from the north. The British cruiser tanks, hidden in folds of the ground near a white mosque and on a small hill the soldiers called “the Pimple”, drove up on to the ridges, fired at the Italian vehicles and then pulled back into cover. That evening an Australian patrol reached Benghazi, and on the morning of 7 February the Australians formally occupied the city, welcomed by the local population. At dawn on 7 February the Italians made a last attempt to break through; the last M13s reached the British infantry positions themselves and were destroyed by anti-tank guns and artillery. Soon afterwards the remnants of the Tenth Army capitulated. Tellera was found mortally wounded in one of the tanks; Bergonzoli and the army staff were taken prisoner.
At Beda Fomm the British took some 25,000 prisoners, more than a hundred tanks, more than two hundred guns and 1,500 vehicles. O’Connor reported to Wavell – in clear, according to the account repeated in the literature – “Fox killed in the open”, in the language of fox-hunting.
El Agheila and the halt
On 8 February the armoured cars of the 11th Hussars, rounding up prisoners and abandoned equipment, pushed on west, and on 9 February reached El Agheila on the Gulf of Sirte, on the border of Tripolitania. They met no organised defence. O’Connor and his officers were convinced that they could reach Tripoli before the Germans arrived. But the vehicles were worn out, and the supply lines stretched back more than a thousand kilometres to Egypt.
The decision on any further advance, however, was taken in London. Greece, which in January had rejected an offer of British ground troops, was changing its position after the death of its Prime Minister, Ioannis Metaxas, and the Germans were massing troops in Romania and preparing to enter Bulgaria. Around 11–12 February Churchill and the Defence Committee ordered Wavell to hold Cyrenaica with minimal forces and to prepare aid for Greece. According to the account of the staff officer Eric Dorman-Smith, whom O’Connor had sent to Cairo to obtain approval for a march on Tripoli, on 12 February he found Wavell poring over maps of Greece.
Losses
Italian losses cannot be established exactly, and British and Italian sources give different figures. According to the British official history, in the course of two months 133,298 Italian and Libyan soldiers were taken prisoner, including 22 generals, and some 400 tanks and 845 guns were captured or destroyed; other British compilations speak of more than 130,000 prisoners and as many as 1,290 guns. Italian studies give lower figures for prisoners, about 115,000. The number of Italians and Libyans killed is estimated at no fewer than 5,500 and the wounded at about 10,000. The Italian Tenth Army ceased to exist: only a few thousand men got away from Cyrenaica to Tripolitania.
According to British figures XIII Corps lost about 1,900 men: 500 killed, 1,373 wounded and 55 missing, or about ten per cent of its infantry. The RAF lost 26 aircraft in combat, and far more were put out of action by damage that could not be repaired quickly for lack of spare parts. Two divisions had taken several times their own number of prisoners.
Significance
Operation Compass showed that in the desert victory went to the side that had vehicles, water, fuel and communications. O’Connor took the risk of striking through the gaps and into the enemy’s rear, and then, at Beda Fomm, of a march across unknown desert on the last of his fuel. The British drew lessons from this campaign that later cost them dear: the conviction that tanks could win on their own, without close cooperation with infantry and artillery, and that small mobile columns were enough to dominate the desert.
The defeat was a political catastrophe for Mussolini. After the setbacks in Greece and the losses of the fleet at Taranto, Italy had lost an entire army in Africa, and the “parallel war” that the Duce had wanted to wage independently of Germany was over. Adolf Hitler, worried not so much about the military consequences of losing Libya as about the possible fall of Mussolini, decided to send German troops to Africa. As early as January aircraft of the Luftwaffe’s X Fliegerkorps appeared in Sicily and attacked the Mediterranean Fleet and Malta, and on 12 February 1941, three days after the British had halted at El Agheila, General Erwin Rommel, commander of the newly formed Afrika Korps, flew into Tripoli. In February Graziani asked to be relieved of his command, and he was succeeded by Gariboldi.
The decision to halt the advance and send the best units, including the 6th Australian Division, to Greece remains one of the most controversial British decisions of the war. Some historians believe that in February 1941 the British could have taken Tripoli and ended the war in North Africa; others point out that worn-out vehicles and long supply lines made a further advance impossible, and that the Germans would have defended Tripolitania in any case. The troops sent to Greece were defeated in April in the Balkan campaign, while weak, inexperienced units were left in Cyrenaica. On 24 March Rommel went over to the offensive and in less than three weeks regained almost all the territory won in Operation Compass, with the exception of Tobruk. During the retreat the Germans captured O’Connor. The front in the Western Desert was to swing back and forth for almost two more years, until the Battle of El Alamein.