1940–1943: The North African campaign
Battle of Alam el Halfa
- Dates:
- 30 August – 5 September 1942
- Front:
- Mediterranean
- Location:
- The southern sector of the El Alamein position in north-western Egypt: the desert between Ruweisat Ridge and the Qattara Depression (the hill of Qaret el Himeimat), and the Alam el Halfa ridge some 10–20 km from the coast, in the rear of Eighth ArmyOn the battle map →
- Sides:
- United Kingdom (with troops from New Zealand, Australia, British India and South Africa, and American air units)Bernard Montgomery, Harold Alexander, Brian HorrocksNazi Germany and ItalyErwin Rommel, Walther Nehring
- Result:
- British victory. Panzer Army Africa's attack on the southern flank stalled in the minefields and before the Alam el Halfa ridge, under constant air attack and without fuel. From 2 September Rommel withdrew, and by 5 September his troops stood almost on their start line, keeping only the captured British minefields in the south. The New Zealand counter-attack (Operation Beresford, 3–4 September) failed.
- Author:
- Natalia
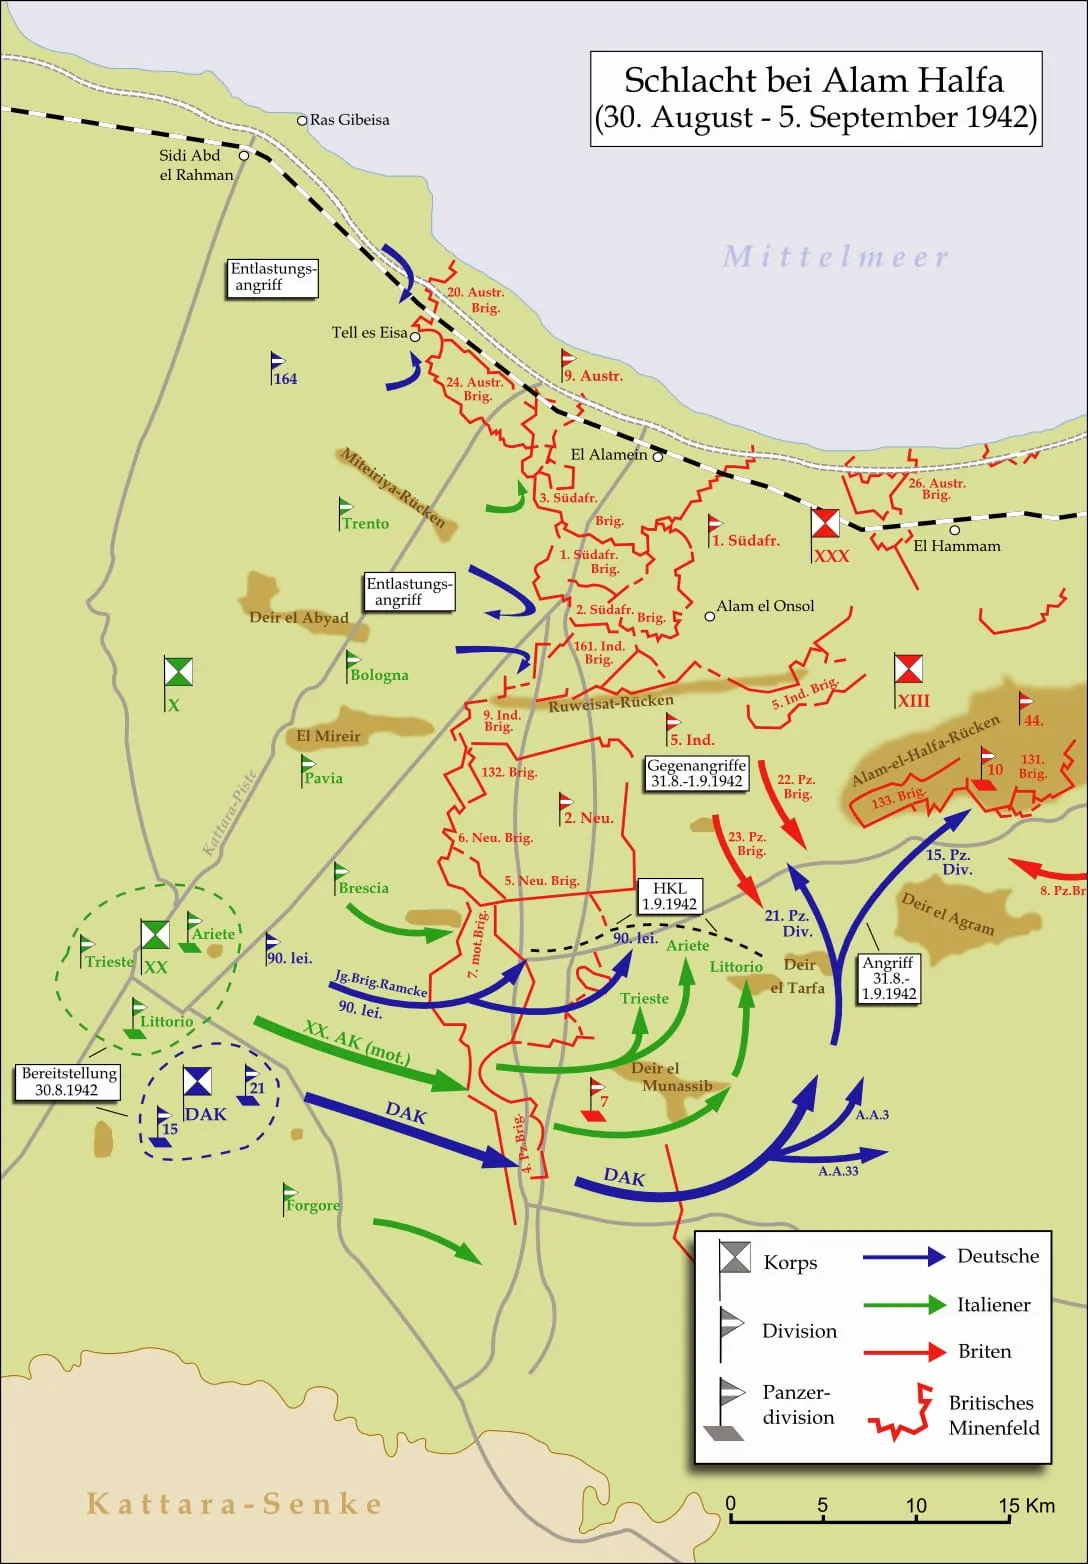
The Battle of Alam el Halfa was Field Marshal Erwin Rommel’s last attempt to conquer Egypt. At the end of August 1942 the German-Italian Panzer Army Africa had been standing for two months at El Alamein, some 100 km from Alexandria. Rommel knew that time was working against him: new British divisions and American tanks were on their way to Egypt, while his own supplies were being sunk by submarines and aircraft from a reviving Malta. He decided to strike before the enemy’s superiority became overwhelming – to outflank the more thinly held southern wing of the British position, swing north, cut Eighth Army off from its rear and destroy it in the open.
The new commander of Eighth Army, Lieutenant General Bernard Montgomery, knew of this intention from decrypted German signals. He let Rommel pass through the minefields in the south and waited for him on the Alam el Halfa ridge, with his tanks dug in among anti-tank guns and artillery. On the night of 30/31 August the German and Italian armoured divisions went into the attack. They got stuck in minefields deeper than expected, lost two generals in the first hours, and on the afternoon of 31 August were thrown back from the ridge. For the next few days they stood without fuel in a desert hollow, bombed day and night by the Allied air forces. On 2 September Rommel ordered a withdrawal. Montgomery did not send his tanks in pursuit – and although he was criticised for this, the battle restored Eighth Army’s belief in itself and took the initiative in North Africa away from the Axis.
Name and dates
The battle takes its name from the Alam el Halfa ridge (also written Alam Halfa) – a low, stony rise running from west to east in the rear of the El Alamein position, some 10–20 km from the coast. Its highest point, marked on maps as Point 132 (after its height above sea level in metres), was the objective of the German armoured divisions. The actual fighting thus took place not “a few miles south of El Alamein” but in the desert south-east of the station, in a belt stretching from Ruweisat Ridge to the Qattara Depression. In contemporary German documents, including war diaries, the battle is sometimes called the “Second Battle of El Alamein” – in which case Montgomery’s October–November offensive becomes the “third”. In some of the literature the German plan of attack appears under the code name Brandung (Surf).
The battle is taken to have begun on the evening of 30 August 1942, when at about 10 p.m. German and Italian units moved off from their start positions; sources agree on this date. The end is a matter of convention. Most often it is given as 5 September, when, according to the British official history and most studies, the Axis troops were back almost on their start line. Some German studies extend the battle to 6 September, when the regrouping of the southern wing was completed, and some biographies of the commanders give yet other limits. Some lists also record under 10 August that Rommel began his attack at El Alamein on that day – in fact the front was quiet on 10 August, and the attack, repeatedly postponed for lack of fuel, began only on the night of 30/31 August.
Background
After the First Battle of El Alamein
The First Battle of El Alamein had in July 1942 halted the advance of Rommel, who after the Battle of Gazala and the fall of Tobruk had reached the threshold of the Nile Delta. General Claude Auchinleck repulsed the attack of the exhausted German divisions, but his own counter-attacks in the second half of July collapsed, and at the end of the month the front froze between the sea and the Qattara Depression. Both sides went over to the defensive and began a race for reinforcements.
Winston Churchill, who had been pressing for weeks for a swift offensive, flew to Cairo at the beginning of August together with the Chief of the Imperial General Staff, General Alan Brooke, and went on from there to talks with Stalin in Moscow. Auchinleck was dismissed. General Harold Alexander became Commander-in-Chief Middle East, and Eighth Army was to go to Lieutenant General William Gott, commander of XIII Corps. On 7 August Gott was killed when his transport aircraft was shot down, and Montgomery was brought out from England in his place. On 13 August, two days earlier than he had been instructed, he took command of Eighth Army. He forbade any further preparations for a possible retreat deeper into Egypt, announced that the army would fight where it stood, and brought out from England Lieutenant General Brian Horrocks, who on 15 August took over the leaderless XIII Corps in the southern sector of the front. Montgomery also moved his headquarters to the coast, next to that of the Desert Air Force under Air Vice-Marshal Arthur Coningham, so that the army and the air force could plan the battle together.
Rommel’s supplies
In August Panzer Army Africa rebuilt its strength. Infantry was flown in, mainly via Greece and Crete, including the German parachute brigade of General Hermann-Bernhard Ramcke and the Italian Folgore Parachute Division. At the end of August, according to various tallies, the Germans had about 230 tanks at the front and the Italians about 280, most of them, however, obsolete and worn out. The weakest point was supply. Benghazi lay over a thousand kilometres behind the front, Tobruk about 550 km, and Tripoli was almost useless. Every tonne of fuel had to be brought across a sea on which the British were once again on the hunt.
Malta, whose capture had been postponed for the sake of the pursuit into Egypt, regained its strength in August. Operation Pedestal brought the island aviation fuel and supplies in the middle of the month, and the submarines and torpedo aircraft operating from it, supported by bombers from Egypt, once again began to sink ships bound for Libya. According to German figures, the tonnage unloaded in Africa in August fell by more than 40 per cent compared with July. Before the attack Rommel demanded several thousand tonnes of fuel and ammunition; according to the British official history, by 29 August more than half the ships sent from Italy had been sunk, and about 1,500 tonnes of fuel had reached Tobruk. The field marshal was also ill – for weeks he had been suffering from stomach complaints and circulatory problems, and his doctor was recommending a long course of treatment in Europe.
The attack had originally been planned for the full-moon night around 26 August; it was postponed several times for lack of fuel. In the end Rommel decided to strike when the chief of the Italian Supreme Command, Marshal Ugo Cavallero, promised him deliveries by tanker, and the commander of German forces in the south, Field Marshal Albert Kesselring, a loan of about a thousand tonnes of fuel from Luftwaffe stocks. In the view of some historians it was an all-or-nothing gamble: there was enough fuel for a few hundred kilometres of driving per vehicle, and only on the assumption that the attack went quickly.
Rommel’s plan
The El Alamein position could not be outflanked – to the south it was closed off by the Qattara Depression, impassable to armoured columns. The north and centre of the front were strongly fortified and densely mined. Rommel concluded that his only chance lay in the southern sector, between the New Zealand “box” on the Alam Nayil ridge and the hill of Qaret el Himeimat on the edge of the depression, where according to his reconnaissance the minefields were shallow and the defence weak. The plan resembled the manoeuvre at Gazala. In the north, the Italian XXI Corps with the Trento and Bologna Divisions, the German 164th Light Division and part of Ramcke’s brigade were to pin down the enemy with feint attacks. In the south, by night, the Afrika Korps of General der Panzertruppe Walther Nehring – the 15th and 21st Panzer Divisions – and the Italian XX Motorised Corps with the Ariete and Littorio Armoured Divisions and the Trieste Division, screened to the north by the 90th Light Division, were to pass through the minefields and advance 40–50 km eastwards by dawn. In the morning the armoured divisions were to swing north towards the coast road, emerge in the rear of Eighth Army, draw the British tanks onto themselves and destroy them in the open, and then encircle the main British forces in the north. “Operations will then continue eastwards,” Rommel’s plan concluded. Success depended on speed and surprise, and on the British reacting slowly, as usual.
Montgomery’s defence
There was no surprise. At Bletchley Park the British were reading some of the messages enciphered with Enigma, and in the second half of August they intercepted, among other things, the appreciation of the situation that Rommel had sent to Berlin and Rome on 15 August. Montgomery thus knew of the intended attack, the direction of the main thrust in the south and the enemy’s fuel difficulties; decrypted signals of the Italian navy and the Luftwaffe kept him informed of the movements of supply ships. Auchinleck and his adviser Major General Eric Dorman-Smith had already identified the Alam el Halfa ridge in their appreciation of 27 July as the key to the defence against an outflanking move from the south, and had begun to fortify it. Montgomery took over this idea but gave it his own shape and greatly strengthened the forces holding it.
The northern sector, from Ruweisat Ridge to the sea, was held by Lieutenant General William Ramsden’s XXX Corps with the 9th Australian Division, the 1st South African Division and the 5th Indian Division. South of Ruweisat began the sector of Horrocks’s XIII Corps. Its corner was the box of Lieutenant General Bernard Freyberg’s 2nd New Zealand Division on the Alam Nayil ridge. Beyond it, as far as Himeimat, stretched a belt of minefields and wire guarded only by two light brigades of the 7th Armoured Division – the 7th Motor Brigade and the 4th Light Armoured Brigade. Their task was to inflict as much loss as possible on the attackers, then get out of the way and harass their flank.
The real barrier lay further on. Two brigades of the 44th Infantry Division, newly arrived from England, had dug in on the Alam el Halfa ridge with divisional and corps artillery. In front of its western end stood Brigadier George Roberts’s 22nd Armoured Brigade, with about 90 M3 Grant tanks and several dozen light tanks, hidden in pits and interspersed with 6-pounder anti-tank guns. To the east stood the 8th Armoured Brigade of the 10th Armoured Division, and in reserve, at the eastern end of Ruweisat, the 23rd Armoured Brigade with Valentine infantry tanks. Montgomery issued a clear order: the tanks were not to charge the German anti-tank guns, as in earlier battles, but to stay put and fire on the approaching enemy like anti-tank artillery. Horrocks, in his words, was to repulse Rommel “without being badly mauled” in the process. At the front Eighth Army had some 700 tanks in all, including about 160 Grants; the American Shermans promised in June by Franklin Delano Roosevelt were not yet used in the battle.
Course of the battle
The night of 30/31 August: the minefields
The attack began on 30 August at about 10 p.m., on a bright, moonlit night. In the north and centre of the front the Italians and Germans made feint attacks; the strongest, on Ruweisat Ridge, brought them temporary gains, which the Indians and New Zealanders retook in a counter-attack at dawn. In the south everything went wrong from the start. The minefields proved much deeper than reconnaissance had suggested, and the brigades of the 7th Armoured Division fired on the sappers and columns before withdrawing eastwards as ordered. The air force had spotted the concentration of vehicles even before dusk. All night long Fairey Albacore torpedo-reconnaissance aircraft of Fleet Air Arm squadrons operating from land airfields dropped flares over the columns crowded in the gaps, while Wellington bombers and the artillery pounded the illuminated targets.
That same night the Afrika Korps lost its commanders. Nehring was badly wounded by bomb splinters during an air raid, and the commander of the 21st Panzer Division, Generalmajor Georg von Bismarck, was killed at the head of his division – according to most accounts by a mine, according to others by a mortar bomb or in an air raid. Command of the corps passed to the commander of the 15th Panzer Division, Generalmajor Gustav von Vaerst, and of the 21st Division to Colonel Carl-Hans Lungershausen.
At dawn on 31 August the leading units of the Afrika Korps stood only a few kilometres beyond the minefields, instead of the 40–50 km the plan had assumed. The Italian XX Corps was still stuck in the first belt of mines. Rommel, who had come up to the front, considered breaking off the attack, but after talking to the Afrika Korps chief of staff, Colonel Fritz Bayerlein, decided to continue it – on a shorter axis. Instead of a wide sweep towards the coast, the armoured divisions were to turn north earlier, straight for Point 132 on the Alam el Halfa ridge. This was exactly what Montgomery had expected.
31 August: the attack on the ridge
The 15th Panzer Division moved off at about 1 p.m., the 21st Panzer Division an hour later, and the Italian armoured divisions later still and far behind. For several hours a sandstorm shielded the Germans from the air force, but the soft sand into which the columns drove consumed huge quantities of fuel. Towards evening the German tanks approached the positions of the 22nd Armoured Brigade. The long-barrelled Panzer IVs, of which the Germans had only a few dozen, opened fire at long range and destroyed several Grants; the Grants, with their main gun mounted in the hull, could not fire from behind cover. But when the German columns came closer, they ran into the fire of the dug-in tanks, the anti-tank guns and the artillery of the 44th Division and the New Zealanders. One of the 22nd Brigade’s regiments lost a large part of its tanks in a short time, but the gap was quickly closed by tanks from the brigade’s reserve. An attempt to outflank the British position from the east collapsed under anti-tank fire. At dusk Vaerst halted the attack. According to the British official history the Germans lost 22 tanks that day and the British 21.
1–2 September: without fuel under the bombs
On the night of 31 August/1 September the Albacores and Wellingtons returned over the desert hollow in which the German and Italian columns stood. On the morning of 1 September only the 15th Panzer Division was still able to attack. It approached the eastern flank of the 22nd Brigade but was stopped by a flank attack from the 8th Armoured Brigade. The British, as ordered, did not press a counter-attack and husbanded their tanks; both sides lost few tanks, but the Germans were stuck where they were under constant artillery fire. The 21st Panzer Division did not move at all – most probably for lack of fuel. Meanwhile the gap between the 22nd Brigade and the New Zealanders had already been closed by the 23rd Armoured Brigade with about a hundred Valentines, which Montgomery had moved down from the north as soon as he was sure that the main thrust was coming in the south.
The decisive factors proved to be the war over fuel and the battle in the air. Coningham’s Desert Air Force, supported by American squadrons, flew round the clock. By night Wellingtons and Albacores harried laagers and supply columns; by day tight formations of Boston and Baltimore bombers, under a strong escort of Kittyhawk and Hurricane fighters, bombed the packed vehicles. The few German fighters were unable to break through this screen. According to Afrika Korps reports, on one night some 300 aircraft dropped about 2,400 bombs on its positions. The German and Italian soldiers had barely slept for several nights.
At sea the situation was even worse for Rommel. On 30 August Beaufort torpedo bombers from Malta sank the tanker San Andrea on its way to Tobruk, and in the following days aircraft torpedoed or bombed further fuel ships, including the Abruzzi and the Picci Fassio. The British learned their courses from decrypted signals. Of the fuel promised by Mussolini and Cavallero, at most half, by various estimates, reached Africa, and even that had to travel hundreds of kilometres by lorry. On the morning of 2 September Rommel concluded that the attack had failed and that standing in the hollow under the bombs would only multiply his losses. He decided to withdraw gradually to his start line. In his report to the High Command of the Wehrmacht he justified this by the lack of fuel, the enemy’s air superiority and the loss of surprise. The same day armoured cars of the 4th/8th Hussars of the 4th Light Armoured Brigade came upon a column of some 300 supply lorries near Himeimat and destroyed 57 of them. Italian armoured units had to be sent back to protect the supply lines.
Operation Beresford and the end of the battle
Montgomery noticed the preparations for withdrawal but had no intention of risking his armoured divisions in a pursuit. He merely ordered the 7th Armoured Division to harass the retreating enemy from the south, and the New Zealanders to strike south from the Alam Nayil box and close the gaps in the minefields through which the enemy was withdrawing. He stipulated, however, that the troops were to avoid excessive losses. Operation Beresford began at 10.30 p.m. on 3 September. It involved the experienced 5th New Zealand Brigade, the 132nd Brigade of the 44th Division, recently arrived from England and not yet blooded, and Valentine tanks of the 46th Royal Tank Regiment, while the 6th New Zealand Brigade made a diversionary attack.
The 5th Brigade inflicted heavy losses on the Italians and beat off counter-attacks in the morning. On the right flank, however, everything went wrong. The diversionary raid alerted the defenders, the 132nd Brigade reached its start line an hour late, and the Valentines lost their way in the dark and drove into a minefield, where twelve of them were disabled. The defenders from the 90th Light Division and the Italian Folgore Parachute Division inflicted, according to British figures, 697 casualties in killed, wounded and missing on the 132nd Brigade and 275 on the New Zealanders. The commander of the 132nd Brigade, Brigadier C. B. Robertson, was wounded, and the commander of the 6th New Zealand Brigade, Brigadier George Clifton, was captured by a Folgore patrol. Freyberg judged that a renewed attack had no chance, and with the consent of Horrocks and Montgomery the troops were withdrawn to their start positions on the night of 4/5 September.
From then on the Afrika Korps withdrew almost unmolested on the ground, although the air force – according to British figures almost a thousand sorties in twenty-four hours – attacked it to the end. By 5 September the Axis forces stood almost on their start line. They kept only the captured belt of British minefields in the south, together with the observation post on Himeimat, and at once began to fortify it as the new southern flank of the front.
Losses
According to the British official history (Playfair), Eighth Army lost about 1,750 men killed, wounded and missing in the battle – a large proportion of them in the failed Operation Beresford – as well as 67 tanks and 15 anti-tank guns. Some of the tanks were only damaged and returned to service. The same history puts Axis losses at about 2,900 men (1,859 Germans and 1,051 Italians), 49 tanks (38 German and 11 Italian), over 50 guns and nearly 400 vehicles, mostly lorries destroyed from the air. Other studies give somewhat different figures. Aircraft losses are estimated at several dozen on the Allied side and somewhat fewer on the Axis side – the figures vary from author to author. For the first time in the North African campaign the British had not lost many times more tanks than the enemy, and the battlefield, with its wrecked Axis vehicles, remained in their hands.
Significance
The Battle of Alam el Halfa was the last Axis offensive in Egypt and the last serious attempt to reach the Suez Canal. Rommel, who after the First Battle of El Alamein had still hoped for victory, could from now on only defend himself. He blamed the defeat above all on the lack of fuel, the Italians’ broken promises and Allied command of the air; he did not know that the enemy had been reading his signals and had known in advance both his plan and the courses of his tankers. Historians stress the combination of these factors: a well-prepared defence on the ridge, superiority in tanks and artillery, signals intelligence, an air force working in close cooperation with the army, and the campaign against Axis supply at sea, resumed thanks to Malta. At the end of September the sick Rommel left for treatment in Europe, and command of the Panzer Army passed to General Georg Stumme.
For Eighth Army the battle mattered above all for morale. After a year of defeats, retreats and changes of command, the army had fought a battle to a plan that everyone understood, and had won it. The New Zealand official history calls Alam el Halfa a test of morale after which hope returned. Montgomery, in command for barely a fortnight or so, won the confidence of his soldiers, and Horrocks a reputation as one of the best corps commanders. It was also the first joint victory of British ground forces and American air power in Africa.
The battle was controversial from the start. Montgomery was criticised for failing to seize the opportunity when the German armoured divisions stood without fuel between the minefields and the ridge, and for letting them get away undisturbed. After the war the German staff officer Friedrich Wilhelm von Mellenthin described the paralysed, bombed divisions waiting for a British blow that never came; Rommel is said to have remarked to Kesselring about Montgomery at the time: “The swine isn’t attacking!” Montgomery replied that his army was in the middle of being rebuilt, full of new, untried units and unprepared for a pursuit across the whole of Libya, and that rash attacks on a German anti-tank screen had cost Eighth Army many battles in the past. He preferred to save his tanks for his own carefully prepared offensive.
The second dispute concerns the authorship of the plan. In his memoirs Montgomery claimed that he had found an army geared to retreat and had himself created the defence on the Alam el Halfa ridge. Auchinleck’s supporters, notably the historian Correlli Barnett, pointed out that the position had already been identified and fortification begun by Auchinleck and Dorman-Smith at the end of July. Most historians today accept that Montgomery inherited the general concept, but that it was he who gave the defence its final form, strengthened it with the 44th Division and armoured reserves, imposed an iron discipline of fighting from fixed positions and restored the army’s self-confidence.
After the battle Eighth Army spent nearly two months preparing for an offensive. New divisions and several hundred Shermans arrived. On 23 October 1942 Montgomery attacked at El Alamein, and the Second Battle of El Alamein ended in November with the defeat of Panzer Army Africa and its retreat westwards. On 8 November the Allies landed in French North Africa (Operation Torch), and in May 1943 the Axis forces surrendered in Tunisia. Alam el Halfa was the first link in this chain: after it the initiative in North Africa passed permanently into Allied hands.