1940–1943: The North African campaign
Second Battle of El Alamein
- Dates:
- 23 October – 11 November 1942
- Front:
- Mediterranean
- Location:
- The El Alamein position in north-western Egypt, some 100 km west of Alexandria: the belt of desert between the Mediterranean coast (El Alamein railway station) and the Qattara Depression (Miteirya and Kidney ridges, Tel el Aqqaqir, the hill of Qaret el Himeimat), then the coast road through Fuka, Mersa Matruh and Sidi Barrani to the Libyan frontier at SollumOn the battle map →
- Sides:
- United Kingdom (with troops from Australia, New Zealand, South Africa and British India, the Free French, a Greek brigade and American air units)Bernard Montgomery, Harold Alexander, Oliver Leese, Herbert LumsdenNazi Germany and ItalyErwin Rommel, Georg Stumme, Wilhelm von Thoma
- Result:
- Decisive British victory. After twelve days of attritional fighting (23 October – 4 November) Eighth Army broke through the Axis position at El Alamein. The German-Italian Panzer Army Africa lost most of its tanks and artillery and some 30,000 prisoners, and its remnants retreated along the coast road; by 11 November the Axis forces had been driven out of Egypt. The threat to the Suez Canal and the Middle East was removed for good.
- Author:
- Natalia
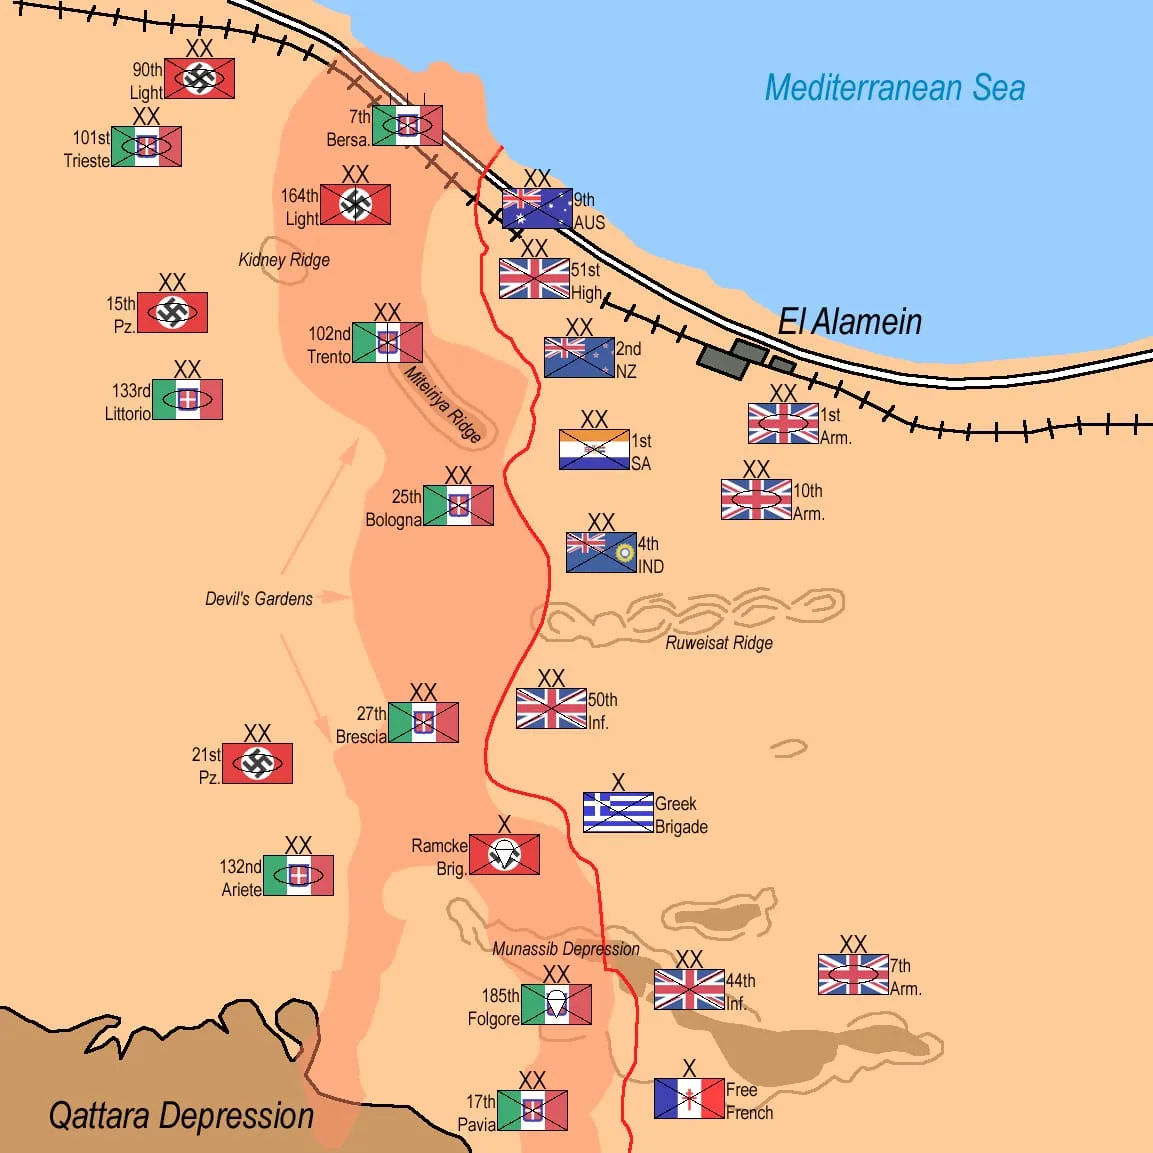
The Second Battle of El Alamein was the first great victory of the British Army over the Germans in the Second World War and the turning point of the war in North Africa. Since July 1942 the German-Italian Panzer Army Africa had stood at El Alamein, some 100 km from Alexandria, in a narrow position between the sea and the impassable Qattara Depression. Two attempts to break the deadlock – Rommel’s in the First Battle of El Alamein and the British counter-attacks in July – had come to nothing, and the last Axis offensive had broken against the Alam el Halfa ridge at the turn of August and September. Now it was Eighth Army that held the advantage: more men, almost twice as many tanks, command of the air and supplies flowing unhindered through the Suez Canal, while its opponent was short of fuel and ammunition.
Lieutenant General Bernard Montgomery, who had commanded Eighth Army since August, had no intention of outmanoeuvring the enemy in the open desert. He planned a battle of attrition: a night infantry attack through dense minefields behind a barrage from nearly a thousand guns, the armoured divisions passing through the corridors cut in the minefields, and then the methodical “crumbling” of the defence until the enemy ran out of men and tanks. On the evening of 23 October 1942 Operation Lightfoot began. For the first few days the battle went almost exactly as the sceptics had feared: the tanks stuck fast in the minefields and losses mounted. Montgomery, however, regrouped his forces several times, shifted the weight of the attack and forced Erwin Rommel – who had returned to Africa after the death of his deputy – to use up his last reserves in counter-attacks. On 2 November Operation Supercharge pierced the last line of defence, and on 4 November Rommel, in defiance of Hitler’s order to fight on to “victory or death”, began to retreat. By 11 November the last Axis troops had left Egypt.
Name and dates
In Polish the battle is called the Second Battle of El Alamein; British literature knows it as the “Second Battle of Alamein” or simply “Alamein”, German literature as the “Zweite Schlacht von El Alamein”. The name comes from the small railway station of El Alamein on the line from Alexandria to Mersa Matruh, near which the northern end of the front lay. The British names of the successive phases come from the operational code names: Lightfoot (the break-in, 23–24 October) and Supercharge (the final breakthrough, 2–4 November); the deception measures before the battle were code-named Bertram.
Most historians date the battle itself to 23 October – 4 November 1942: from the opening of the artillery barrage at 9.40 p.m. Egyptian time to the order to retreat that Rommel issued on the afternoon of 4 November. The pursuit is counted in as well, ending on 11 November when the New Zealanders took the Halfaya Pass on the Egyptian–Libyan frontier – the day the last Axis units withdrew from Egypt. Rommel’s further retreat through Cyrenaica and Tripolitania into Tunisia was a separate campaign.
Background
In the summer of 1942 the war in North Africa was approaching its decision. After his victory in the Battle of Gazala and the capture of Tobruk, Rommel had advanced into Egypt and was stopped only at El Alamein, the last position before the Nile Delta, by General Claude Auchinleck. In August Winston Churchill, disappointed by the lack of progress, changed the command: General Harold Alexander became Commander-in-Chief Middle East, and Eighth Army – after the death of Lieutenant General William Gott, who had been appointed first – went to Montgomery. Repulsing Rommel at Alam el Halfa won the new commander the confidence of his troops and time to prepare an offensive of his own. Churchill pressed for an attack as early as September; Montgomery and Alexander refused, arguing that the army needed training and that the attack had to be made by the light of a full moon. The date was fixed for 23 October – two weeks before the Allied landings in North-West Africa, planned for 8 November.
The balance of forces had tilted clearly in favour of the British. According to the most widely quoted figures from the British official history, on the eve of the battle Eighth Army had some 195,000 men and 1,029 tanks in front-line units (more than 1,200 including reserves), among them about 250 new American Shermans and 170 Grants, together with some 900 field and medium guns and about 1,450 anti-tank guns, including some 850 of the new 6-pounders. Panzer Army Africa had, by various calculations, between 104,000 and 116,000 men (slightly more Italians than Germans) and 547 tanks, nearly 280 of them obsolete Italian M13/40s and M14/41s; the two German panzer divisions had about 250 tanks between them, including a mere 30 long-barrelled Panzer IVs capable of taking on a Sherman. The Allied air forces – the RAF and the American squadrons in the Middle East – had about 730–750 combat aircraft; the Germans and Italians had some 675 machines in Africa, of which little more than half were serviceable. From the first day of the battle the Allies commanded the air.
Supply and intelligence mattered even more. Thanks to decrypted signals (Ultra) the British knew the routes of ships sailing for Libya and sank them with submarines and aircraft from Malta, which had revived after Operation Pedestal. Rommel’s supplies had to travel hundreds of kilometres from the ports of Tripoli, Benghazi and Tobruk, and on the eve of the battle the army had fuel for only a few days’ fighting. The sick Rommel flew out on 23 September for treatment in Europe, handing over command to General der Panzertruppe Georg Stumme, who had come from the Eastern Front.
Montgomery’s plan put the main blow on the northern sector of the front. The four infantry divisions of Lieutenant General Oliver Leese’s XXX Corps – the 9th Australian, the 51st (Highland), the 2nd New Zealand and the 1st South African – were to cross the minefields in a single night and seize the forward line of the defences. Behind them the sappers were to clear two corridors through which the two armoured divisions of Lieutenant General Herbert Lumsden’s X Corps (the 1st and 10th) would pass, to take up positions west of the infantry and receive the counter-attack of the German tanks. In the south, Lieutenant General Brian Horrocks’s XIII Corps with the 7th Armoured Division was to pin down the 21st Panzer Division and the Italian Ariete Division with a diversionary attack. The infantry would then systematically “crumble” the defence, destroying the enemy piece by piece. Montgomery expected a battle of about 12 days in three stages: the break-in, the “dog-fight” and the final break-out.
The preparations were accompanied by one of the most elaborate deception operations of the war, code-named Bertram. In the north, where the blow was to fall, stacks of empty crates were piled under camouflage nets from September onwards; the Germans took them for permanent dumps and stopped watching them, and night by night they were replaced with ammunition, fuel and food. Tanks and guns were covered with light frames that made them look like lorries. In the south hundreds of dummy tanks and guns of canvas and palm leaves appeared, and a dummy pipeline was built at a pace suggesting that the offensive would not begin until early November. The ruse worked: to the very end the Axis command did not know when or where the blow would fall.
Before leaving, Rommel had prepared a defence several kilometres deep. The Axis troops had laid some half a million mines, most of them anti-tank (many of them British mines captured at Tobruk), in two main belts linked by transverse fields into “boxes” that the Germans called “devil’s gardens” (Teufelsgärten). The forward edge of the minefields was held only by outposts; the main line of defence lay behind the second belt. German and Italian infantry were interleaved in the line so that the Italians would have the support of German battalions. Not knowing where the attack would come, Rommel – against his usual practice – split his armoured reserves into a northern group (the 15th Panzer Division and the Italian Littorio Armoured Division) and a southern one (the 21st Panzer Division and Ariete); the 90th Light Division and the Italian Trieste Division stood in reserve near the coast. He knew that the shortage of fuel would not allow him to fight a battle of manoeuvre: the enemy had to be stopped in the minefields before he could break out into the open desert.
Course of the battle
Operation Lightfoot (23–25 October)
The attack was preceded by intensified air activity: from 9 October the Desert Air Force attacked Axis airfields, and in the last days before the battle it concentrated on German and Italian positions and supply columns. At 9.40 p.m. Egyptian time on 23 October, on a bright night under a full moon, 882 field and medium guns opened fire – about a thousand barrels including the heavy and anti-aircraft guns. The first shells fell simultaneously along the whole front; after twenty minutes the artillery switched to known enemy positions, and from 10 p.m. it laid a creeping barrage ahead of the advancing infantry. In the first five and a half hours it fired more than half a million shells. The code name Lightfoot alluded to the fact that the infantry went first: anti-tank mines did not explode under a man’s weight. Behind them came the sappers, clearing lanes several metres wide, marked with tape and lamps, for the tanks to drive through.
The infantry of XXX Corps reached only some of its objectives. The Australians and Scots in the north and the New Zealanders and South Africans on Miteirya Ridge broke through the first minefield, but the second proved deeper than expected. At about 2 a.m. the tanks of X Corps entered the lanes and stuck fast: the corridors filled with dust, the columns jammed, and at dawn the armoured divisions stood in the minefields or just beyond them, under the fire of German anti-tank guns. In the south the 7th Armoured Division and the 44th Division failed to break through two minefields held by the Italian paratroopers of the 185th Folgore Division. On the extreme left flank General Marie-Pierre Kœnig’s 1st Free French Brigade attacked the hill of Qaret el Himeimat but was driven back by German tanks; Lieutenant Colonel Dimitri Amilakhvari, commander of the 13th Foreign Legion Half-Brigade, was killed in the fighting.
On the morning of 24 October Stumme drove to the front to assess the situation for himself. His car came under fire; the general fell or jumped from the vehicle and died of a heart attack, and his body was found only the next day. Command passed temporarily to General Wilhelm von Thoma, commander of the Afrika Korps. On the evening of 24 October Hitler telephoned Rommel, who was taking a cure at Semmering, and asked him to return. Rommel flew back via Rome, where he demanded fuel from the Comando Supremo, and on the evening of 25 October resumed command.
Meanwhile the British attack was losing momentum. On the night of 24–25 October the 10th Armoured Division was to break through beyond Miteirya Ridge, but German aircraft set fire to a column of fuel and ammunition, and in the morning the tanks stood on an exposed slope under the fire of anti-tank guns. Lumsden and the commander of the 10th Division, Major General Alexander Gatehouse, wanted to halt the attack. At 3.30 a.m. Montgomery summoned Leese and Lumsden to his command vehicle and categorically demanded that the tanks push on, even at the cost of heavy losses; he threatened to replace commanders who did not carry out the order.
The “dog-fight” (25 October – 1 November)
By the morning of 25 October the British had driven a wedge some 10 km wide and 8 km deep into the Axis defences, but the tanks had not broken out into the open desert. Montgomery judged that a further New Zealand attack south of Miteirya Ridge would be too costly and shifted the weight of the fighting to the north. On the night of 25–26 October the 26th Australian Brigade took Point 29 – a small rise with an artillery observation post south-west of Tel el Eisa – and threatened to encircle the coastal salient held by the German 164th Light Division and Italian infantry. The hill was then fought over for a week. Counter-attacks by the 15th Panzer Division, Littorio and the Bersaglieri broke down under artillery fire and bombing.
Rommel, convinced that the issue would be decided in the north, brought up the 21st Panzer Division, part of Ariete and half the artillery from the south, and the 90th Light Division from reserve. He knew that, for lack of fuel, this move could not be reversed. On 26 October British aircraft sank the tanker Proserpina, carrying 4,500 tons of fuel, and the freighter Tergestea at Tobruk, and on 28 October the tanker Luisiano off the coast of Greece. Rommel told his commanders that it was impossible to disengage, because there was no petrol to do it, and that the only course left was to fight it out at El Alamein. In London Churchill, following the reports impatiently, reportedly asked whether it was really impossible to find a general who could win a battle.
The most famous episode of these days was the defence of the outpost “Snipe” south-west of Kidney Ridge – a shallow depression, not a ridge as its name suggests, over which armoured battles had been fought since 24 October. On the night of 26–27 October it was occupied by Lieutenant Colonel Victor Turner’s 2nd Battalion, the Rifle Brigade, with thirteen 6-pounder anti-tank guns and six guns of the 239th Anti-Tank Battery. Throughout 27 October, cut off and under constant fire, the battalion beat off attacks by German and Italian tanks and, in the afternoon, Rommel’s main counter-attack. According to the British regimental history it destroyed or disabled 22 German and 10 Italian tanks (other estimates give more); Turner was awarded the Victoria Cross. On 28 October the 15th and 21st Panzer Divisions renewed their counter-attack on the X Corps front, but they were stopped by the fire of artillery, tanks and anti-tank guns, and when they tried to form up for another attack they were bombed for two and a half hours. This was Rommel’s last attempt to regain the initiative. According to an intercepted report of 28 October he had only 81 serviceable German and 197 Italian tanks left, against some 800 British.
Montgomery, meanwhile, was pulling divisions out of the line to form a reserve for a fresh blow, while the Australians of Major General Leslie Morshead attacked in the north, towards the coast. On the night of 28–29 October and again on the night of 30–31 October the 9th Australian Division struck at the so-called Thompson’s Post and reached the coast road and the railway, almost cutting off the coastal salient. On 31 October a battle group of the 21st Panzer Division made four attacks on the Australian position, all of them repulsed; in this fighting Sergeant William Kibby was killed and posthumously awarded the Victoria Cross. The Australian attack fulfilled a role the original plan had not foreseen: it drew the last German reserves, including the 90th Light Division, to the north and left the sector south of Point 29 more thinly held. It was there that Montgomery decided to deliver the decisive blow.
Operation Supercharge (2–3 November)
The new attack, postponed by a day to the night of 1–2 November, was to break through on a front about 4 km wide south of Point 29, towards the hill of Tel el Aqqaqir and the Rahman Track behind it – the backbone of the Axis defence. It was led by Lieutenant General Bernard Freyberg’s 2nd New Zealand Division, reinforced by two British infantry brigades (the 151st from the 50th Division and the 152nd from the 51st Highland) and the 9th Armoured Brigade. The attack was preceded by seven hours of air raids and the fire of 360 guns. At 1.05 a.m. on 2 November the infantry moved off and by dawn, with moderate losses, had taken almost all its objectives; lanes were cleared through the minefields, and through them the armoured cars of the Royal Dragoons slipped into the enemy’s rear and spent the whole day destroying his columns.
The hardest task fell to Brigadier John Currie’s 9th Armoured Brigade. At dawn it was to break the screen of anti-tank guns along the Rahman Track so that the 1st Armoured Division could pass through the gap. Currie warned that the brigade would lose half its tanks; Freyberg passed on to him that Montgomery was prepared to accept the loss of the entire brigade, provided the gap was made. At 6.15 a.m., half an hour before sunrise, the brigade’s three regiments charged the gun line, silhouetted against the brightening sky. They destroyed about 35 guns and took several hundred prisoners, but of the 94 tanks that went into the attack only about twenty remained in running order, and of some 400 tank crewmen 230 were killed, wounded or captured. No gap was made, and the 1st Armoured Division, which arrived too late, was held up by the same gun screen.
During the day Rommel threw the remnants of the 15th and 21st Panzer Divisions and Littorio into a counter-attack. Around Tel el Aqqaqir the greatest tank battle of the African campaign was fought. The counter-attacks broke against dug-in British tanks, anti-tank guns, artillery and bombs; losses on both sides were similar, but for Eighth Army they represented only part of its strength, for Rommel most of his tanks. In the evening General von Thoma reported that the next day he would have at most 35 serviceable tanks, and that his artillery and anti-tank weapons had dwindled to a third. Rommel decided to fall back to a position at Fuka, some 80 km to the west, and reported this to Rome and to Hitler’s headquarters. The withdrawal of the Italian infantry divisions from the southern sector began that same night.
The “victory or death” order and the breakthrough (3–4 November)
At 1.30 p.m. on 3 November Hitler’s reply reached Rommel’s headquarters. The Führer wrote that the German people were following “the heroic struggle in Egypt” with confidence, that in such a situation there could be no other thought than to hold fast, to yield not a metre of ground and to throw every gun and every soldier into the battle, and that the troops could be shown no other road than the one leading “to victory or death”. Mussolini issued a similar order through the Comando Supremo. Rommel later wrote that the order demanded the impossible and that, for the first time in the African campaign, he did not know what to do. He obeyed: he halted the withdrawal already under way, pulled the Afrika Korps back only a few kilometres, and ordered the Italian infantry corps to stand fast. That day the Desert Air Force flew more than 1,200 sorties – the most of the entire battle.
During the night of 3–4 November and at dawn, three infantry brigades from the XXX Corps reserve – the 152nd (Highland), the 5th Indian and the 154th (Highland) – attacked the Rahman Track. The defence was by now so weak that the 5th Indian Brigade took its objective almost without a fight, and the 154th Brigade walked onto Tel el Aqqaqir after the enemy had already withdrawn. On the morning of 4 November the British armoured divisions at last broke out into the open desert. South of the Afrika Korps headquarters the Italian XX Corps – the remnants of the Ariete, Littorio and Trieste Divisions – fought superior British forces for several hours and was destroyed; at 3.30 p.m. Ariete sent its last signal, reporting that it was surrounded and that its tanks were still fighting. Rommel later wrote of the Italians that they had fought “with exemplary courage”. That same day General von Thoma, who had personally directed the defence in the front line from a tank, was taken prisoner; in the evening he dined with Montgomery at his headquarters.
On the afternoon of 4 November Rommel concluded that a gap more than ten kilometres wide had opened in the front and that he had no reserves left. Without waiting any longer for Hitler’s reply, at 5.30 p.m. he gave the order to retreat; the Führer’s consent arrived only later. The previous day’s order to stand fast cost the army most dearly: the non-motorised Italian infantry divisions – Bologna, Trento, Brescia, Pavia and Folgore – were left in their positions without lorries, fuel or water. Some of them tried to break out on foot across the desert and surrendered, exhausted, over the following days; many thousands of soldiers were taken prisoner. The paratroopers of Folgore, who had defended the southern sector throughout the battle, laid down their arms only on 6 November.
The pursuit (5–11 November)
The pursuit did not bring about the destruction of the remnants of Rommel’s army for which Montgomery had hoped. The armoured divisions, scattered after twelve days of fighting, struggled to squeeze through the crowded lanes in the minefields; attempts to cut the coast road with wide hooks through the desert at Fuka, Sidi Haneish and Mersa Matruh arrived a few hours too late, and the 1st Armoured Division ran out of fuel. On 6 and 7 November torrential rain turned the desert tracks to mud and brought the pursuit to a standstill, while the German troops withdrew along the metalled coast road. The last rearguards left Mersa Matruh on the night of 7–8 November – the day the Americans and British landed in Morocco and Algeria – and held Sidi Barrani until the evening of 9 November. On the morning of 11 November the 5th New Zealand Brigade took the Halfaya Pass, capturing 600 Italian prisoners, while the 7th Armoured Division outflanked Sollum and Fort Capuzzo from the south. By that evening there were no Axis troops left on Egyptian soil. On 13 November the British entered Tobruk for the third time.
Losses
According to the British official history, Eighth Army lost 13,560 men between 23 October and 4 November: some 2,350 killed, 8,950 wounded and 2,260 missing. Fifty-eight per cent of the casualties were British, 22 per cent Australian, 10 per cent New Zealand and 6 per cent South African. Between 332 and about 500 British tanks were knocked out, most of which could be repaired; the artillery lost 111 guns and the air forces 97 aircraft (77 British and 20 American).
Axis losses are much less certain because of the chaos of the retreat. British estimates based on intercepted signals give 1,149 German dead, 3,886 wounded and 8,050 prisoners, and 971 Italian dead, 933 wounded and 15,552 prisoners; Fritz Bayerlein, in a footnote to Rommel’s memoirs, gave 1,100 German and 1,200 Italian dead. The Italian official history estimates Axis losses in the battle itself at 4,000–5,000 killed and missing, 7,000–8,000 wounded and 17,000 prisoners, and considerably more including the retreat. By 11 November the number of prisoners had risen to some 30,000, about two-thirds of them Italians. The Panzer Army lost some 500 tanks – on 4 November only 36 of its 249 German tanks were left – as well as several hundred guns and 84 aircraft.
Significance
The Second Battle of El Alamein ended the struggle for Egypt and removed for good the threat to the Suez Canal and Middle Eastern oil. The Panzer Army, stripped of most of its tanks, artillery and Italian infantry, was no longer capable of prolonged resistance: for the next three months it retreated across Libya, in January 1943 the British entered Tripoli, and in May 1943 the remnants of the Axis forces, squeezed in Tunisia between Eighth Army and the troops that had landed in North-West Africa on 8 November, capitulated.
For Britain the victory was of immense moral and political importance. After three years of defeats – from Norway and Dunkirk to Singapore and Tobruk – the British Army had beaten the Germans in a major battle before the Americans took over the main burden of the war in the West. On 10 November, at the Mansion House in London, Churchill declared that this was not the end, nor even the beginning of the end, but “perhaps, the end of the beginning”. On his instructions church bells rang throughout the country on Sunday 15 November; they had been silent since 1940, when they were reserved to announce a German invasion. He later wrote that before Alamein “we never had a victory” and after it “we never had a defeat” – an effective line, if not entirely accurate. Montgomery became the best-known British general of the war, and in 1946 he took the title Viscount Montgomery of Alamein.
The battle was controversial from the start. Critics accused Montgomery of excessive caution, of costly tank attacks against screens of anti-tank guns and of a slow pursuit that allowed Rommel to save the core of his German motorised forces. His defenders pointed out that with deep minefields and no open flank, manoeuvre was impossible, and that a battle of attrition, fought with a flexible shifting of the weight of attack, was the only way to exploit his superiority. Many historians stress that it was decided as much by Eighth Army’s material superiority, air power, signals intelligence and the war on Axis supplies at sea as by the decisions of the commanders.
Operation Torch began almost simultaneously with Alamein, and on 19 November the Red Army launched its counter-offensive at Stalingrad, which encircled the Sixth Army. The autumn of 1942 – with El Alamein, Stalingrad and Guadalcanal – is therefore regarded as the turning point of the Second World War, after which the initiative passed to the Allies.